8.10.2010

Contact Paper Kites

These cute kites require many steps, but they are all fairly simple. M1 & her friend "A" loved making them. After the project was finished I decided to add a string to the top of the kite so she could run with it while holding on to the string. Definitely gave her the feeling of flying her kite.
Supplies- *Contact Paper, *Construction Paper, *Scissors, *Sequence, *Stickers, *Feathers, *Thin Ribbon, *Markers, *Coffee Filters, *H2O Spray Bottle
1. Cut out an outline of a kite using the construction paper. (Seen Below)
 
2. Place the kite outline on the contact paper with the sticky side up.
3. Give the little ones time to decorate the kite by laying sequence, stickers, etc. on the sticky contact paper. (Unfortunately I didn't take pictures of the girls decorating... lots going on & M2 was not happy during that time!)

4. Once it's all decorated, place another piece of contact paper over the sticky side to seal the decorations in. Trim off the extra around the edges of the kite.
5. Punch a hole in the bottom of the kite & attach a 2 1/2 foot piece of string.
6. Now the ties... use washable markers to color all over a coffee filter, pictured below.

7. Take the colored filters outside & spray with water.
8. Allow them to dry.
9. Once the filter is dry, cut out 3-4 oval/rectangular pieces. Discard the scraps.
10. Pinch each piece together in the center & tie onto the kite string as shown below.
11. Done & ready to fly around the yard!
As I mentioned earlier, I did fasten a string to the top of the kite also. M1 & A had a great time flying their kites around the yard!
Enjoy! s.b.

8.06.2010

Juice Bottle Bug House

If M1 wasn't so afraid of bugs this would be a great project.
I may have to craft it with her & give it a try because I think having bugs in a container to watch would be right up M2's alley. She's not nearly as girly as M1 is. My hope is that if the bugs are contained M1 won't freak out as much. It is ridiculous how much she hates bugs...definitely takes after her mom, the only difference is the bugs I'm terrified of are much bigger & much uglier (centipedes)!!  Fingers crossed... I have yet to see one here in our new town. Sounds like they aren't as big of an issue here... Hooray!
Here are the directions...Juice Bottle Bug House
I'll post pics once we actually make ours...Bugs aside, I think the girls will enjoy collecting all the bug "food" and sticks to create the bug home.
Have fun & enjoy! s.b.

8.03.2010

Handprint Flowers

Today was one of the first days that I really had to beg M1 to do a craft! She's usually so excited to create something. We're all a bit under the weather this week, so maybe that had a little something to do with it! (Also why you'll see she's still in her pj's!)
Supplies- *Colored Construction Paper, *Scissors, *Glue, *Green Pipe Cleaner, * Pencil

1. Trace your little one's hand on one of the pieces of construction paper. (I traced one hand & then cut 3 pieces of paper @ once to speed it up.) You can make as little or as many flowers as you wish.
2. Cut out the "hands."
3. Glue each of the hands onto the base piece of paper. We chose to use blue.
 
4. Cut the pipe cleaners to size so they fit onto the piece of paper.
5. Glue them onto the bottom of the flowers.
6. Cut out a handful of leaves using green construction paper.
7. Glue the leaves around the stems & allow some time for the picture to dry!
Enjoy! s.b.

8.02.2010

100 Followers!

I'm so happy to have reached 100 followers! I truly hope that many of you have found some fun things to do with your little ones through visiting s.b.creatively now & then. I enjoy doing the crafts with M1 & M2 & look forward to doing oodles more in the future. Thank you to all of my followers & don't be afraid to share s.b.creatively with LOTS of others!! THANK YOU!!!!

7.27.2010

Faded Alphabet

Finally the rain has stopped...we've had so very few sunny days in the past three weeks. It's definitely nice to see the sun! Hopefully the slow down with the rain also keeps the building of our house moving along.
Here's what we crafted yesterday. Perfect for a cloud-free day!
Supplies- *Black construction paper, *Alphabet magnets, *Tape..not glue!, *Scissors optional in case your little one wants to cut out the letters.
1. Head outside & find a flat place to set the black piece of paper. (We used the patio table.)
2. Use two small pieces of tape to fasten the paper to the surface so it doesn't blow away.
3. Assist your little one in placing the letters right side up all over the paper.
4. Now is the long part. Let the letters sit untouched in the warm sun for at least an hour. (We let ours sit for a few hours. It may depend on how strong the sun is & the time of day.)
5. After the paper has faded, go ahead & let your little one discover the letters on the paper. M1 thought this was so crazy & was so excited to show others!
6. Then it's all up to you. We used the paper to practice letter recognition by saying a letter & having M1 find it. I think after a few days of this game, we'll go ahead & cut them out so we can put them in ABC order. That's where the glue may come in handy. The individual letters could then be glued onto another colorful piece of paper.
Enjoy! s.b.

7.20.2010

A Craft For Moms...Decorative Fabric Boards

As many of you know, we've moved & are temp. living with my parents until our house is built. (Hopefully done early October...HOPEFULLY!) I crafted these fabric boards while still living in our past house to minimize sound in our long upstairs hallway. I loved the completed project & all three of them will definitely have a home on the wall once our new house is complete. They were fairly easy to make & really reduced the echo in our hallway. Plus, they doubled as decorative wall hangings. I had no need for pictures, etc.

Supplies: *3- 3 1/2 foot squares of plywood, *Cotton batting to cover all three pieces, *A staple gun w/ staples (LOTS of staples!), *3 Coordinating pieces of fabric big enough to cover the wood squares w/ extra for folding over the edge, *Hanging kit for each

1. Lay the fabric, print side down, flat on the floor.
2. Lay one piece of batting over the fabric. Be sure there are no wrinkles.
3. Place one of the boards on top of the fabric & batting so the edges hang over.
4. With a second set of hands for help, begin turning the fabric over the wood & stapling it along the edge as you go. Be sure to pull the fabric nice and tight so there aren't any wrinkles when you're finished.
5. The corners get a little tricky, but not too bad. Just continue around the corner stapling down the extra fabric.
 
6. Once you've stapled all the way around & the fabric is completely secure, the hanging comes next. I used wire & two small eye hooks to hang each board. Screw in the eye hooks about 3 inches from the edges of the boards. (Pic. below)
7. Fasten the wire across the back of the board using the eye hooks.
 8. Use a screw or nail to hang the boards on the wall as shown below.

I loved the finished product. I'm thinking about using the same technique to create a headboard once we're moved in. Looking for something different. Any other ideas??
Enjoy! s.b.

7.13.2010

Doctor's Bag

My grandpa is having knee replacement surgery on Thursday so we decided to make him a card. After a little thought, I decided to create a doctor's bag with the girls. It turned out great & my grandpa really enjoyed it. It was funny seeing him walk out the door of our house carrying his "doctor bag!" It wouldn't have to be used as a card, it could just be a fun project for your child to use for play.

Supplies- *Black, Red, White Construction Paper, *Glue, *Scissors, *Medical Supplies (We used cotton balls, Q-tips, Gauze, Tylenol Box, Band Aids, Tongue depressor, etc.)
1. Fold a black piece of construction paper in half to create your card.
2. Cut out two matching handles for your bag. (Pictured below)
3. Glue the handles onto the top of each side of the bag.
4. Cut out a large piece of white paper to create the frond of the bag. (Pic. below)
5. Cut out or color a red cross to add to the front of the bag.
6. Write a message on the front of the card... we wrote "Good Luck Grandpa"
7. Open up the bag & begin gluing in the medical supplies all over the bag. The band aids will obviously just stick in!

8. Because we used ours as a card, we added a little personal message inside.
9. Lay flat & allow an hour or so to dry.
Enjoy! s.b.

7.08.2010

Wednesday's Library Art Project

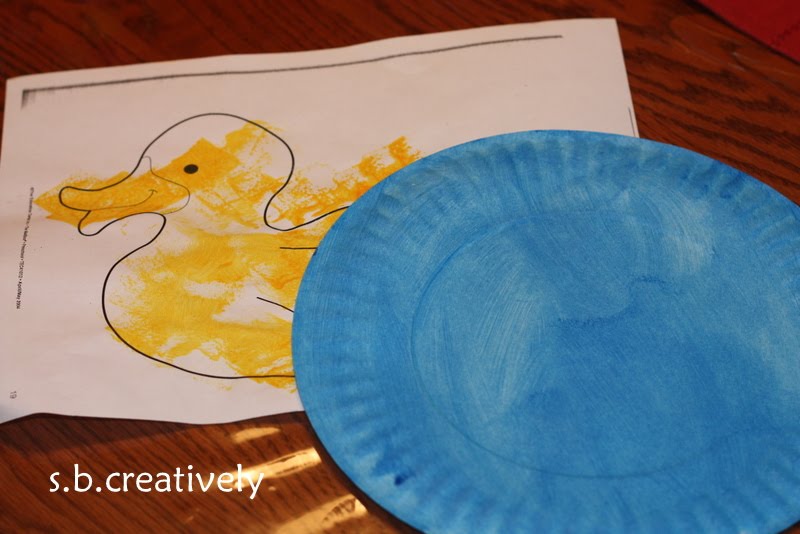
This is a project that M1 started @ the library yesterday. Our library's story time always ends with a craft. Yesterday's story time was all about ducks, so they finished by creating a duck. M1 didn't finish her duck at the library because the paint wasn't dry, so we brought it home to finish. Super cute & very easy to create with a few at home supplies. Also very appropriate after seeing several ducks on the lake up north this past weekend.

Supplies: *Paper Plate, *Picture of a Duck (Printed from the Internet), *Yellow, Blue & Orange Paint, *Sponge, *Glue, *Scissors
1. Sponge paint the entire paper plate blue & allow to dry.
2. Sponge paint the duck yellow & allow to dry.
3. Optional (M1 chose not to do this step.) Sponge the duck's beak orange.
4. Once dry, cut out the duck.
5. Fold the paper plate in half.

6. Apply a large amt. of glue to the plate.
7. Press the duck onto the paper plate.
8. Allow some time to dry completely.
Done! A cute little duck swimming in the pond.
Enjoy! s.b.

7.06.2010

M is for Mosaic

I've just started working a bit harder on the uppercase letters with M1. My goal is to have her writing her name by fall when she'll start 3 year old preschool. She knows all of the letters but is no where near being able to write them & really doesn't have any interest in doing it at all! So I thought maybe if I started crafting with the letters she'd show a little more excitement. We'll see... but I decided to start with M since it's the first letter of her name. M is also for Mosaic!
Supplies: *Construction Paper, Printed letter M (I used a Word Document & blew up the letter), *Glue Stick, *Scissors, *Paper Scraps
1. Cut out the letter "M"
2. Glue it to a piece of colored construction paper. (Your child can choose the color.)
3. Press the letter down to secure it to the paper.
4. Allow your child some time to cut several different colored pieces of construction paper. The small cut up scraps will be used as the mosaic pieces. We used some of the paper scraps we already had in addition to the ones M1 cut herself.
5. Use the glue stick to cover the "M" with glue.
6. Place the colored mosaic pieces to cover the entire letter.
7. Allow drying time & DONE!
This project could be done with any letter of the alphabet. It just so happened that M1's name begins with an "M" so that's what we chose. We'll continue on with the other letters of her name & many others over the next few weeks.
Enjoy! s.b.