Showing posts with label Easter. Show all posts

4.27.2011

May Basket Treats

Hooray... It's almost May! Our family continues to count down the weeks until baby M3 arrives, so we're thrilled to be so close to yet another month. We're also loving the warmer weather. Today we made after Easter treat using the jelly beans from the Easter bunny. They turned out so cute & we're calling them May Baskets! YUMMY!
I bought these from the store to use for the handles of the baskets...
Then used a pizza cutter to slice them a bit thinner...
I also lined them up & let them sit over night thinking they would harden a bit to make a more stiff handle, but they were still pretty soft the next morning. Definitely didn't do what I wanted them to do but it was worth a try! Maybe another day would have done the trick?
Then I made a batch of rice krispie treats according to the directions.
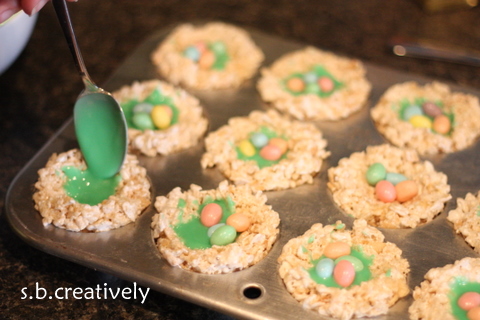
Sprayed our muffin tin with non-stick cooking spray & started adding spoon fulls of rice krispie treats to each muffin cup. Pressed them in firmly & made a small indent in the center of each basket.
For the "grass" we mixed a mixture of powdered sugar & water to a thick frosting consistency & added a few drops of green food coloring.
Spoon a small amount of the green frosting into each basket & top with a few jelly beans or M&M candies. 
Press the "handles" into the rice krispie baskets firmly. Ours stood up pretty well & didn't fall over like I expected them to.
Not that we need any more treats in our house (there is more candy here than we need from Easter) but these were a fun treat for the girls. We'll deliver a few to the neighbors as well.
Enjoy! s.b.

4.19.2011

Envelope Bunnies

Only a few short days until Easter arrives. After a week of baby shower planning (I hosted a shower yesterday.) we're back into Easter mode. This cute idea comes compliments of Martha Stewart and her fabulous website. M & M each made their own Envelope Bunny & they turned out oh, so cute!

Supplies- Glue, Envelope, Scissors, Pink/White/Black Construction Paper, Crayon/Marker, Small Pom Pom.
1. Seal the flap of the envelope. (Gotta love that big tongue!)
2. Draw bunny ears on the sealed side of the envelope, as shown below.
3. Cut out the bunny ears, following the lines drawn above.
4. Use an opposite color construction paper to cut out small ear shaped inserts for the middle of the ears. (For example, we used white inside ears for the pink bunny & pink insides for the white envelope bunny.)
5. Cut out two small black construction paper eyes for each bunny envelope you're doing.
6. Glue the construction paper ear middles onto the envelope ears...
Press down to secure....
7. Glue the black eyes into place.
8. Place a large dab of glue in place of the nose. Set the pom pom onto the glue & allow a few hours to dry.
9. Draw the bunny mouth under the pom pom nose using a crayon or marker. (We did manage to draw the mouth while the glue under the nose was still wet. You could wait to do this step until the nose is completely dry....might be a bit easier!)
10. Once the nose is completely dry fill the bunny pocket with the pretend Easter grass...
And treats of course!

I think these little envelope bunnies would make the cutest little classroom treats. A great alternative to baskets that I'm sure any little one would be delighted to receivce!
Enjoy! s.b.

4.06.2011

Yellow Easter Chick

Our 1st Easter craft this spring...Now if the weather would just warm up a bit so it would actually feel like spring! The girls were excited that this particular chick had moving arms!

Supplies- Yellow/Orange Construction Paper, Glue, Scissors, Tape, Google Eyes, Brass Fasteners, Yellow Feather.
1. Cut out a large egg shape for the body, a diamond shape for the beak & two small orange legs.
2. Trace two little hands on the yellow construction paper & cut out.
3. Use the brass fasteners to attach the hands to each side of the body for the wings (large oval).
*These fasteners were super cheap @ Michael's... if you don't have them handy, just glue the hands (wings) to the side of the chick. He'll still be just as cute w/o moving arms!)
(Closing the fasteners to complete the attachment)
4. Turn the chick over & glue on the eyes. (If you don't have google eyes, small construction paper circles can be used in their place.)
5. Fold the orange diamond shape in half to create a small beak. Glue it beneath the eyes.
6. Glue the legs onto the bottom of the chick.
7.. Use a small piece of scotch tape to fasten the feather to the top of the chick (on the backside).
And he's done! M1 & M2 enjoyed flapping the little wings by moving them up & down.
Enjoy! s.b.

4.20.2010

Jelly Bean Door Hanging

Not only is April 22nd Earth Day, it's also National Jelly Bean Day. It is a perfect opportunity to use up all the left over jelly beans & have an excuse to keep eating them a month after Easter!! The Earth Day posts will arrive later this week & into next week, so be on the look out for those also. But for now, use up the jelly beans & create this cute door sign with your little one. It's a great activity that promotes sorting & letter recognition too.

Supplies- *Jelly Beans, *Glue, *A Piece of Cardboard, *White Paper (To cover the cardboard), *Scissors, *Crayons, *Stickers, *Ribbon for Hanging.
1. Cut a piece of cardboard to your desired size & cover it with white construction paper using glue to secure it.
2. Use crayons that match the jelly beans to write your child's name across the paper, seen below. (We chose to do M1's initials instead of her name.) If your child is old enough to write his/her own name, they can do it themselves.
3. Have your child sort through the jelly beans picking out the colors used to write their name. Put them into small piles according to color.
 
4. Once there are sizeable piles of bean created, go ahead & put a thick line of glue over the letters.
5. Place the similar color jelly beans along the crayon line until the entire letter is outlined with beans.
6. Allow at least a few hours of drying time. If it doesn't dry completely, the beans will fall off when you stand it upright. It may even be beneficial to leave it set overnight.
7. Punch two holes in the top of the hanging & string the ribbon through the holes, knotting at the ends.
8. Optional- Give your child some time to jazz it up a bit by adding stickers.
8. It's ready to be displayed on a bedroom door or where ever you choose!
Enjoy! s.b.

4.12.2010

Chocolate Birds' Nests

We have so many left over jelly beans in our house, it's crazy. I have to find things to do with them so I STOP eating them. They were the perfect Easter treat for M1 since they do not contain dairy like the majority of the Easter candy does. (She is allergic to all dairy.) I'm working to find a way to get rid of them & this was our first project, Chocolate Birds' Nests. Unfortunately, it involves eating them which is what I'm trying NOT to do!! They were so easy for M1 & M2 to make & fun since we've finally been seeing and talking about all the birds outside again now that Spring has arrived.  Give them a try but don't throw away your other left-over beans just yet... I've got other activites coming up the week of April 22nd. Check back & see!

Supplies: *Jelly Beans, *Chow Mein Noodles, *Chocolate Chips, *Wax Paper, *Spoon, *Microwaveable Bowl
1. Melt 1/2 bag of chocolate chips in a glass or microwaveable bowl in 30 second increments until melted, about a minute & a half. The bowl does get a bit warm so hold off on letting the little ones help with this step.
2. Now the little ones can join in. Have your child add a heaping amount of the Chow Mein noodles & stir until they are completely coated with chocolate.
 
3. Tear a large piece of wax paper & set it on the counter where you'll be working.
4. Using a large spoon, help your child scoop out a fairly large amount of the noodle mixture & place the clump onto the wax paper.
5. Again using the spoon, make a small divot in the top of the "nest" where the eggs will soon be placed.
6. Repeat steps 4 & 5 until the chocolate/noodle mixture is gone.
7. Once all the nests are created & on the wax paper, allow your child to begin placing 3-4 jelly bean "eggs" on top of each nest.
8. Refridgerate for an hour to allow time for the chocolate to set.
Don't forget to check back in a little over a week for some other fun ways to utilize all the extra jelly beans!
Enjoy! s.b. 

4.03.2010

Easter Egg Dippers


This was a last minute creation that we made today. We're headed over to a friend's house for dinner & to Grandma's tomorrow so we'll bring half to each house. I saw them on a commercial & then found the recipe http://www.ricekrispies.com/?utm_source=google&utm_medium=cpc&utm_term=rice%2Bkrispy%2Btreats&utm_campaign=Brand#/recipes/easter-egg-dipper-treats  I shaped the eggs & then let M1 help with the dipping which was right up her alley. She also ate two of them before we even began dipping... We love festive treats!
Happy Easter to All...Enjoy! s.b.

4.02.2010

Plastic Egg Letter Matching Game

If your house is anything like ours, you probably have a million of these little plastic eggs laying around this time of year. They are EVERYWHERE... I can't tell you how many times I day I've picked up these colorful eggs & put them back into one of the many Easter baskets we have! I know M1 & M2 enjoy playing with them, but I was thrilled to find this idea in one of my "teacher" resource books titled Recycled Container Arts & Crafts Acitivites. Finally a purpose for these eggs!
Supplies: *26 Plastic Easter Eggs, *Black Permanent Marker
1. Beginning with the letter "A" and one egg, write a lower case "a" on the top half of the egg & a capitol "A" on the bottom half of the egg.
2. Repeat step 1, writing the remaining upper & lower case letters of the alphabet on the eggs. Because M1 is still in the process of learning her letters, I did write the letter pairs on matching egg pieces. If you're looking for more of a challenge, you could write the upper & lower case letters on different colored halves.
3. Once they were all completed (pictured above) we went ahead & started our matching game.
I placed all of the upper case letters in an Easter Basket & set up the lower case letters on a table so they were all visible. (pictured below)
4. One by one, M1 picked an upper case letter out of the basket & then began looking to find the match.
5. After finding her matching lower case letter, she clicked the pieces of the egg together & set it aside in a seperate pile. She then went on & chose another uppercase letter out of the basket & repeated the process until she had matched them all.
 
Fun "Easter" themed game that works on letter recognition at the same time. Finding a purpose for all those plastic eggs is an added bonus!!!
p.s. An additional activity for older children... addition/subtraction or multiplication/division practice! Example: 1+1= written on the top half of the egg & the answer "2" written on the bottom half.
Enjoy! s.b.

3.29.2010

Easter Bunny Dinner Buddy

Isn't this guy so cute? He's the perfect dinner companion for M1 & definitely created some great conversation at the table. My inspiration for this little friend can be found HERE. I do not own a sewing machine nor do I have all that felt so, I decided to use materials I have in our house to make something very similar & way less work! M1's assistance was fairly minimal for this project. She did stand right next to me the entire time & definitely had fun helping me put the pieces together.

Supplies- *1 White Pillow Case, *White Card Stock (or anything a little heavier than normal), *Black & Pink Construction Paper, *2- 7in. Pieces of Black Ribbon, *Glue Gun, *Scissors.

1. I started by cutting out two large ears. I just cut out two tear drop shapes by hand, using the pillowcase to judge for appropriate size. They ended up being approx. 11 inches tall.
2. Cut out two matching pink tear drops that are just a bit smaller than the white. Glue them onto the white "ears."
3. Now for the little pieces. Using the black paper, cut out two egg shaped eyes (Length-3 inches) & six skinny wiskers, each about 5 inches long. Then with the pink, cut two circles & a triangle nose. And finally, using some of the white paper scraps, cut out two small circles for the center of the eyes.
4. Now that all the cutting is finished, you can start putting your bunny together. Start by gluing the ears onto the top, closed side of the pillow case. Continue on gluing the remaining pieces of the face into place.
5. Once the glue is all set & dry, go ahead & pull the pillow case on over the back of a chair. If the case is a bit too long like mine was, just fold the excess under.
Fairly easy & doesn't involve any sewing, just the way I like it!!
Enjoy! s.b.

3.25.2010

Paper Egg Wreath

I had no idea a wreath made entirely of paper could turn out so cute! In fact, I wish we had made a few more so we could give them to each set of Grandparents as little Easter gifts, which I still may do. I hung this wreath right on the front door & it looks very festive. Even better is the fact that both M1 & M2 did their part for this one.
Supplies- *Paper Ring (Made using a piece of white paper or a paper plate), *Pastel Colored Construction Paper*Scissors, *Glue, *Dot Painters, *Large Egg Shaped Cookie Cutter, *Pencil, *Small Piece of Bright Colored Ribbon (not pictured)
~The dot painters were purchased @ Michaels. They are very similar to bingo daubers but come in fun colors. If you do not have dot painters, you could cut out small circles using construction paper to get a similar look or have your child decorate the eggs with markers, stickers, or whatever else you can find.
1. Start by cutting out the white paper ring. Ours was approx. 10 1/2 inches in diameter.
2. Use the cookie cutter to trace 13-14 egg shapes on several different colored pastel construction paper. (Again, if you don't have an egg shaped cutter, you can always cut them out free hand.) Cut out the eggs.
3. Then the eggs are ready to be decorated. We gave both M1 & M2 a chance do paint the dots on the eggs. It was fun for them use the different colors to "dress up" the eggs.
4. After allowing a few minutes for the paint to dry, begin gluing the eggs around the white ring. Remember to alternate colors. We chose to leave one of each color egg undecorated so there would be a break in the polka dots. M1 helped me choose the pattern, never letting two of the same color touch.
5. Use a scissors or hole punch to creat a small hole at the top of the wreath. String the ribbon through the hole & knot.
6. Hang from a door, in a window or where ever you wish.
A great project for the weekend, Enjoy! s.b.