6.29.2010

Some Red.White.Blue Ideas for the Week

Here are a few projects that I have planned for M1 & M2 this week while we're up north. Hopefully they will enjoy them & give us something to do, esp. if the weather doesn't cooperate. All three ideas came from Family Fun I always have great luck finding cute kiddo activites both online & in the magazine.
Save holiday travels to all....
Enjoy! s.b.

6.25.2010

Craft Stick American Flag

We'll be heading up north next week for the 4th of July so I'm not sure if I'll be posting. No worries, we'll be back the following week with more crafts! Here is our 4th of July door hanging that M1 created this week. It looks great hanging on Grandma's front door & very festive. And this year we're not only creating RED.WHITE.BLUE to celebrate Independence Day but also World Cup Soccer!! We're so proud of our good friend Jay (#15 so you can cheer extra hard for him!!!) & the US team. We are looking forward to the game on Saturday!!!
Supplies- *Craft Sticks (9), *Red, White & Blue Paint, *Paint Brush, *White Paper, *Small Square of Cardboard, *Ribbon, *Scissors, *Glue, *Star Hole Punch
1. Begin by painting the craft sticks.  
***2 sticks-red, 2 sticks-white, 3 sticks- 1/2 red 1/2 blue, 2 sticks- 1/2 white 1/2 blue
As seen below...
2. While the sticks dry, begin covering the cardboard square with glue.
*Our piece of cardboard was 3inches by 3 1/2 inches.
 
3. Once the cardboard is completely covered with glue, begin placing the painted craft sticks into place one by one.
 
4. Using the hole punch & the white piece of paper begin punching out as many stars as you'd like.
*If you don't have a star punch, your little one could create the star look by dipping their finger in white paint & stamping it onto the blue portion of the flag. Cut out stars or stickers would work also.
5. Glue the stars onto the flag & allow time to dry.
6. Once dry, glue or tape the ribbon to the back of the flag so it can be hung where ever you wish!
Enjoy & Happy 4th of July!!!
Go U.S.A.

6.23.2010

Paper Bowl Turtle

As many of you know, we recently went from city living to living with my parents (temporarily) in the country. It's a HUGE change for our family but the girls just love it. For the first time, they are able to run free & do a lot of exploring. Yesterday, we went for a long walk & passed by a small creek. While looking around at the water, we spotted a huge snapping turtle near the side of the road. M1 & M2 thought it was just sooo cool & wanted to do nothing but pick it up and play with it. Ummm.. NO! So we quickly took another look & went on our way. Later in the afternoon, I decided to help them make a turtle.
Supplies- *Green & Brown Paint, *Scissors, *2 Craft Sticks, *Paper Bowl, *Small Piece of Brown Paper/Cardboard, *Google Eyes, *Glue, *Opt.-Sequence & Green Tissue Paper
1. Paint the bowl green & the two craft sticks brown.
2. Decorate the "shell" however you wish. M1 really wanted to add sequence & then I also got out small tissue paper scraps for her to glue on for a little texture.
 
3. Use the brown paper to cut out a rounded head.
4. Glue on the google eyes.
5. Back to the craft sticks. Cut each of the brown craft sticks in half & glue them to the underside of the bowl for legs.
6. Glue the head into place.
7. Allow some time to dry & you're done. M1 & M2 have been playing with theirs all day. M2's is falling apart & missing a leg already but she doesn't care at all.
 
Enjoy! s.b.

6.17.2010

Treats for Daddy

We are trying to decide on a treat to make for Daddy & Grandpa on Father's Day. I did some searching & found these two fun cupcake ideas.
It would be fun to do these....
Since my husband's only request for Father's Day is that he gets to go golfing. (And spend time with us of course!) The complete directions can be found HERE. They look fairly simple... we could have a golf themed Father's Day!
OR we could make these....

I LOVE them! Although I think sometimes I get excited about how cute things are & my husband thinks I'm crazy! This may be one of those things...but I found the idea here @ Kiss My Spatula. It's a really cute site with lots of fun cooking/baking ideas.
So now we just have to decide... which one should we make???
Any thoughts?

6.14.2010

Father's Day Trophy

Good morning all! Father's Day is coming up this weekend. We're looking forward to spending the day together after Daddy goes golfing in the morning. (His one request other than being with the girls!) I found this ADORABLE trophy craft HERE @ Kaboose. A project that I couldn't pass up doing with M1. She also was nice enough to let M2 paint for a bit, so they both contributed to the gift for Daddy. I've found that it's still hard for M2 to sit still long enough to do some of the more time consuming projects. She does love watching for a bit in between playing or whatever she's up to at the moment.
You can find the complete tutorial HERE as listed above or you can follow my directions. I did do a few things differently since I didn't have all of the suggested materials.
Supplies- *Blue & White Construction Paper, *Scissors, *Gold Craft Paint, *Glue Gun, *Tape, *2 Small Paper Cups, *1 Bar of Soap Box, *Paint Brush, *Gold Pipe Cleaners, *Black Marker
1. First of all, the paint did not stick to the paper cups at all! Probably due to the fact that there's a small coat of wax on the outside. So.... in an effort to help the paint coat better I covered the cups & the soap box with white paper as seen below.
*To make covering the cups a bit easier, I cut a cup so the outside would lay flat. Then I traced that so it the white paper was the exact size of the cup.
Covering the box....
2. Once it was all covered, M1 & I went ahead and glued the three pieces together. We used a glue gun.
3. M1 then got her brush ready & began painting. She was super excited about the shinny gold paint. It "looked so sparkly!"
4. Then I used the blue construction paper to cut out a two inch number "1."
5. M1 glued it to the trophy.
6. Let the trophy sit for a few minutes to dry before moving forward.
7. Cut one gold pipe cleaner in half & then fasten it to the trophy as seen below using the glue gun.
8. Add a small personalized "plate" to the front bottom of the trophy to personalize. We chose for ours to read "Worlds Best Dad." You could write whatever you wish.

And, done! A great gift for dad. M1 can not keep a secret AT ALL & I knew that my husband would look at the blog before the weekend, so we chose to give it to him a bit early. He's one happy Dad & is looking forward to displaying on his desk @ work. He definitely is the Worlds Best Daddy! xoxo

6.10.2010

Go U.S.A.!!!

We're two days away from the big match between U.S.A. & England... so why not continue crafting to show some spirit?! Today M1 & I made a U.S. flag to keep up with the festivities. It's a great independent project for kids of any age. M1 did not do the cutting for the project, but an older child could absolutely do that on his/her own. She did enjoy gluing on the shapes & creating a flag of her very own. I enjoy how excited she is each time we finish a project... definitely very proud of her work!
Supplies- *Red, White & Blue Construction Paper, *Glue Stick,  *White Paint, *Scissors, *Pencil (Used to trace the lines for an older child to cut along.)
1. Cut out five long, 1 inch strips of red paper.
2. Cut one large blue square, set aside.
*While I was doing the cutting for the project, M1 sat at the table with me & did a little cutting of her own. She could cut up pieces of paper all day long...

3. One by one, glue the red strips & place them onto the white paper leaving a little space in between each strip.
4. Glue the blue square into place. (Upper left corner)
5. Using the little one's finger, begin dipping it into the paint & stamping on the "stars."
(I drew small dots in a line along the blue paper as a guide for M1 when stamping her prints. It helped her keep them in a somewhat straight line.)
6. Allow some time to dry. (Sorry for the blurry picture below!)
Done! We'll definitely be bringing out our flag on Saturday while we cheer on the USA during their match against England. Between the flag & the soccer balls the girls created we'll be all set!
ALSO... One of my blog readers (Who lives in South Africa right amongst the World Cup action!...) did a similar project with her little one using sheets of colored foam. Below is a picture from HER BLOG of her little one with their S. African flag. Be sure to check it out.
It's so fun for little ones to use different materials when crafting. M1 would have been thrilled to use foam for this project but I don't have any at the moment.  So fun!
Bring on the weekend, we're looking forward to cheering for #15! Go U.S.A.   
Enjoy! s.b.

6.08.2010

World Cup Time!!!

Our house is REALLY excited for the World Cup to start this week. One of my close friends (#15 Jay Demerit) is playing on the US Soccer team & we can't wait to watch him! It's a bit too far for us to travel right now to watch live but we've been reading articles, watching the pre-world cup games, etc. It is so fun to see him & all he's accomplished. So in honor of this rare & exciting event, the girls & I created soccer balls today.
This post is a bit lengthy. I started by creating a soccer ball with M1 & then went on & made the project a bit easier for M2.
Supplies- *Black Paint, *Black Marker, *White Construction Paper, *Cardboard (optional),*Sponge, *Craft Sticks, *Glue, *Not Pictured-Scissors & A Bowl for Paint
1. I began by creating the below pentagon template using a Word document. You should be able to right click on the image below & save it to print for your own use. 
2. Then I cut out one of the pentagons, traced it onto the sponge as seen below & cut it out.
3. Using a large piece of white construction paper, cut out a circle to be used as the ball. (I also cut out a cardboard circle the same size & glued the two circles together to make it a little less flimsy.)
4. Pour a small amount of black paint into a bowl.
5. Using the pentagon shaped sponge for dipping, have your child dip it into the bowl & coat with paint.
6. Stamp a half dozen or so pentagons onto the circle ball.
 7. Once the soccer ball is filled with pentagon stamps, allow some time for the paint to dry.
8. Once dry, use the black marker to connect the pentagons with straight lines. I definitely had to help M1 with this a bit, but once we got started she got the idea.
9. Glue the craft stick to the bottom for a handle & allow to dry. Done... with the first one, not on to M2.
Once M1 was done with her soccer ball, I gave her the print out of the pentagons & gave her a few minutes to stamp the remaining pentagons with black paint. (pictured below) It was a great activity for her to match up the sponge stamp with the shape. She really enjoyed it.
Once these pentagons dried, I cut them out & helped M2 create her own soccer ball also. Instead of stamping with the sponge, I helped her glue the cut out pentagons onto a circle of her own. She was so happy & loves to get messy with the glue.
We drew the connecting lines together, added a stick handle, let it dry & they were all set. Definitely ready to cheer on Jay during Saturday's match against England!!!
 
Enjoy! s.b.

6.04.2010

It's Graduation Party Season!

With the school year coming to an end there are many things on a mother's mind. For some, it's graduation! College, High School, Middle School, Elementary School or even Kindergarten/Preschool...any graduation is fun to celebrate & makes the students feel extra special.
Below is a picture that inspired a cake that I made last summer for my husband when he graduated with his Masters Degree. Instead of the date, I printed Congrats across the letters & added two chocolate grad. hats(also pictured below) in each of the top corners. I used M&M's to decorate around the edge of the cake & personalized using only his college's school colors. (A little time consuming picking through the bag to get only the colors we needed, but we also enjoyed eating the colors we didn't need for the cake!) I used Ghirardelli chocolate squares for the lettering.
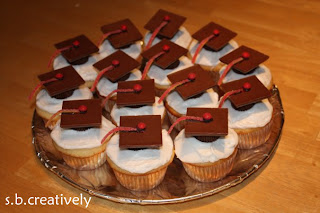
In addition to the cake I also made graduation cupcakes (pic. below) that M1, M2 & I brought him at work as a surprise the Friday before his graduation. (This all took place last summer WAY before my blogging days so unfortunately I don't have a complete picture tutorial) But it was fairly easy to do- the girls & I made the cupcakes, frosted them with white frosting & then put together the grad. hats using a few sweet treats...
*Small Reeses Peanut Butter Cups for the base of the hat.
*Square Ghirardelli Chocolate Squares for the top of the hat (found @ Target in a bag w/ about 10 per package. I also used these same squares for lettering on the cake pictured above.)
*Red Hots or an M&Mmini for the button on top
*Airhead Xtreme Sour Belt Candy- cut apart for a single colored tassel.
*I used a few melted chocolate chips as the "glue" to put the hat together.
As I was browsing online this morning, I also found these adorable graduation hats HERE @ familyfun.com. The website gives complete directions on how to make the hats & the diploma snacks that are also pictured below. So cute, I wish I would have seen this last summer while we were celebrating our big graduation.
Diploma snack wraps (also featured on the familyfun link above)...so fun for little ones!
M1 & M2 would enjoy these any day, no graduation celebration needed.
Enjoy! s.b.