12.29.2010

Countdown to 2011 Clock

This is one of our previous projects but it would make a great "Countdown" clock for New Year's Eve!
Visit the original post HERE to see the full tutorial.
We're going to do our official countdown a bit earlier with M1, M2 & friends. I think the little ones will enjoy counting down on their own little clock & being able to change it ever hour as we count down! We'll probably start @ 9:00 and count down to 12:00 when the big celebration happens. I'm looking forward to seeing how they react this year now that they are a bit older!
Enjoy! s.b.

12.28.2010

New Year's Eve Noise Maker

Christmas has come & gone & we're now on to New Year's Eve festivities. We're having a few friends over to our house to celebrate both the New Year & M2's 2nd Birthday (a.k.a. Happy TWO Year! It's also her golden birthday... pictures to come!) I wanted to have a fun project planned for all the little ones Friday evening while we're celebrating to go along with all the hats, snacks & fun, so we took it for a test run today... New Year's Noise Makers!

Supplies- Large Paper Plate, Glue, Stapler, Uncooked Beans or Rice, 1 Large Popsicle Stick, Glitter, Various Decorations (foam pieces, sequence, stickers, etc. Basically whatever you can find!), Crayons/Markers for some color.

1. Fold the paper plate in half as seen below.
2. Staple around the edge of the plate about 3/4 of the way around, leaving a small hole near the end.

3. Fill the shaker with a handful of beans by pushing them through the unstapled end of the paper plate.

4. Complete the edge by stapling the rest of the way around, securing the beans inside the shaker.
5. Wedge the popsicle stick in between two of the staples near the bottom center of the shaker.
(If necessary, secure with a piece of scotch tape.)
6. Decorate away! I let M1 & M2 just place pieces where they wished until it was somewhat covered.
7. We also added a little glue/glitter to the outside edge of the shaker in an attempt to cover the staples a bit.
 (I gave M1 the option to color the shaker to give it some more color but she was happy with it just the way it was!)
8. Allow to dry & Shake Away!
I am looking forward to making these with all of our visitors Friday night. I'm pretty certain they'll have fun shaking & dancing to some music. I'm hoping to add some tissue paper streamers around the outside to jazz it up as well. I can't believe it's almost 2011!!!
Enjoy! s.b.

12.20.2010

Making Reindeer Food

We've got the cookies all baked & decorated for Santa & this morning we decided to make a little treat for Rudolph & all of his reindeer friends as well.
So easy... and the girls had so much fun. They are more than excited to scatter this all over the lawn (snow) for the reindeer to snack on while stopped at our house. They even had a little taste themselves!

Supplies- Sugar, Oats, Red/Green Sprinkles, Measuring Cup, Ziploc Bags or some other form of storage.

Mix 1/2 cup oats...

With 1/2 cup sugar....

Add some festive color with sprinkles (we used red & green)...

And mix well....
Place the reindeer food into a small ziploc bag & store with Santa's cookies until Friday night when it will be time to leave it all out!
Here is a cute little poem I got from a teacher friend to go along with the reindeer creation...

Make a wish & close your eyes tight
Then sprinkle on your lawn tonight
As Santa's reindeer fly & roam
The food will guide them to your home!

We're definitely ready for their arrival & the girls are soooo excited.
Enjoy the countdown this week. We sure will be!!
s.b.

Winner!

And Congratulations to the #15 post Jessica!!! You have won the CSN backpack giveaway!!! With very few entries, the odds were quite high for anyone who entered. Jessica, please send me an email @ s.b.creatively@gmail.com with your mailing address & which adorable backpack you'd like. I'll order it & have it sent as soon as I recieve your email.
Congrats again & thank you to all who entered. I enjoyed reading all of your comments. Especially the ones who commented about their experiences crafting with s.b.creatively. I love reading & knowing that people really do implement the crafts with their little ones. Please keep the posts coming & let me know if you're featuring s.b.creatively on your own personal blog! 
Looking forward to a few more giveaways in the future!
Enjoy! s.b.

12.15.2010

Handprint Santa

It's hard to believe that Christmas is just over one week away. I'm not ready for it all to be over just yet!!! Below is a craft that we made for the Grandma's last year. I did this one using M2's hand print & then the rest of the crafting I completed myself. When finished, we put them in festive frames so they could be used each year for decorations, & who could forget that tiny little hand print?!

If you're interested (sorry no tutorial for this one!), here is what you need...
Supplies- Blue Cardstock, White Paint, Paint Brush, A Small Piece of Red Corduroy, 2 Google Eyes, Red/Black/Pink Paper, A Small Pom-Pom, Small Silver Bead Strip & A Glitter Pen.

1. I stamped M2's hand 4 times on four different pieces of 4x6 paper. (One for each of the Grandma's & one for us!) I painted her hand first with the white paint & stamped it onto the paper, making sure to press down on each finger.
2. Once the hand prints were dry, I went ahead & started jazzing up this little Santa, using glue to fasten each piece on one at a time.
-Google eyes.
- Cut a small black circle nose.
-Cut two small pink circles for the cheeks.
- Cut a "hat" with the red corduroy. (If you don't have this, you could use red paper.)
-Add the fancy silver bead strip to the bottom of the hat. (Small pieces of cotton could be used for this as well.)
-Small pom-pom or cotton added to the end of Santa's hat.
-Last one! I used the silver glitter pen to write M2's name & add a few "ho, ho, ho's" to the picture.

Frame it & it's such a fun gift for grandma's, a teacher, godparents, etc. A cute little keepsake too!
Don't forget to enter in the Holiday Backpack Giveaway below... Tell all of your friends too! Winner will be chosen Monday!!!
Enjoy! s.b.

12.13.2010

Horray!! A Holiday CSN Giveaway....

Have you discovered the wonders of CSN for your Holiday shopping this year? Where else can you find gifts for everyone including Children's Luggage for the kids, Bakeware for Mom or Grandma, Tools & Equipment for Dad & various Holiday Decorations for all? CSN has got it all... one stop shopping is the way to go! Did I mention we ordered ALL of the lighting for our new home online @ CSN? Everything arrived quickly & we couldn't be happier. There was soooo much to choose from.

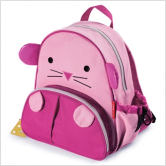
I just ordered one of these as a 2nd birthday gift for M2...
Isn't it adorable? She loves bringing M1 to school each week & begs her to carry her backpack as well. So why not get M2 her own backpack to carry. I think she'll be thrilled!

But the good news is, I loved this Skip Hop Backpack so much that I'm GIVING ONE AWAY AS WELL!!!! If owls aren't your little one's cup of tea, no worries CSN's Children's Luggage store has a few more to choose from. Maybe you'd rather have one of these...


Either way there are 4 ways for you to enter this GIVEAWAY...
1. Become a new s.b.creatively follower. Leave a comment telling me you did so.
2. Pass on s.b.creatively to a friend & if they become a follower, you both get an entry! Again, leave a comment on this post telling me you did so.
3. Post about s.b.creatively on your own personal blog. Copy the link into a comment on this post.
4. Leave a comment about your experiences crafting with s.b.creatively or CSN shopping on this post.

Four EASY ways to enter...four chances to win!!! Each entry will be given a number & I'll generate a winner @ random.  Enter now, this GIVEAWAY starts now & will end next Monday, December 20th. I'll post the winner sometime Monday & get in contact with them a.s.a.p.

Good luck to all! I'm hoping this generates a lot of response so we can have MORE giveaways in the future! I'm looking for more weekly comments & site interaction. I want to know who's crafting with s.b.!
Enjoy! s.b.

12.08.2010

Paper Plate Wreath 2

Here is M2's wreath...
Supplies- Paper Plate (with the center cut out), Green Tissue Paper, Red Construction Paper, Small Piece of Ribbon, Scissors, Scotch Tape & Glue

1. Cover the paper plate with glue.

2. Cut a few dozen 1 inch squares of green tissue paper. Place them in a small pile near your little one.
3. Begin placing the tissue squares all over the paper plate until it's completely covered. (Or to your little one's liking!)

4. Cut out 10-12 small red circles using the red paper.
5. Glue them around the wreath where ever you wish.

6. Trace two small hands using the red paper.
7. Cut out both hands & glue them to the bottom of the wreath facing down for the "ribbon."
8. Attach a small piece of ribbon (for hanging) to the back of the paper plate with scotch tape.
Done! A cute little holiday decoration for your own home or to give as a cute home-made gift!
Enjoy! s.b.

Paper Plate Wreath

Both girls have been begging me to craft with them lately... must be due to the small decline in crafting while we were living with Grandma & moving. I'm not nearly as organized as I was in the last house but we're getting closer. For now, being slightly unorganized makes the whole process a bit more challenging!

Yesterday we made Paper Plate Wreaths... it ended up that each of the girls crafted a slightly different wreath than the other, so I'll post them as seperate posts instead of one long post. Here is M1's wreath...

Supplies- Paper Plate (with center cut out), Green Paint, Paint Brush/Sponge, Red, Yellow & Orange Construction Paper, Red Buttons, Sequence, Etc., Small Piece if Ribbon, Scotch Tape, Glue, Scissors.
1. Paint the paper plate green. Allow a few mintutes to dry.

2. While drying, gather all of your wreath decorations... we used small red paper circles (that we cut out), red buttons, red/green sparkly pom poms & red sequence.
3. Once dry, begin glueing all of the decorations onto the wreath.

4. Cut out a small red rectangle, (Ours is 3in. by 1.5 in.) a large orange "flame" shape & a small yellow "flame." *Pictured below.

5. Assemble the flame by glueing the pieces together.
6. Fasten the flame to the back of the wreath so it shows through the middle using scotch tape.

7. Next, fasten the ribbon to the top, back of the wreath using tape as well.
8. Allow ample time to dry so your heavier objects (like the pom poms if you have them) have time to dry & they don't fall off :)
Enjoy! s.b.

12.02.2010

Handprint Menorah

Happy Hanukkah to all! The teacher in me loves to teach the girls about all kinds of Holidays, even those we may not personally celebrate. I have several Jewish friends, so Hanukkah just happens to be one that I know a little more about. This is a project I did during my preschool teaching days (A part time gig that I did while prego with M2). The finished product is just so precious...

Supplies- Blue & White Construction Paper, Blue & Yellow Paint, Paint Brush, Black Marker, Glue, Scissors.
1. Paint one little hand blue & stamp onto the white construction paper.
2. Repeat with the opposite hand being sure to overlap the thumbs (pictured below)... the menorah only needs 9 candles. Tricky when we've got 10 little fingers!

(Overlapping thumbs)
 
3. Use a fingertip & dip it into the yellow paint.
4. Stamp a yellow print on top of each of the 9 fingers or "candles."
5. Cut 13 small blue squares & print each letter of HAPPY HANUKKAH on each square. (As pictured below)
6. Scatter the letters in front of your little one (Assuming they are old enough for letter recognition).
 7. One by one spell out HAPPY HANUKKAH for your little one & allow them to find the correct letter in the pile.
8. Glue on each of the letters one-by-one as they find them.
 And you've got a Menorah!
 Enjoy! s.b.