3.31.2010

March Came in Like a Lion & is Leaving Us Like a Lamb...


Can you believe it is the end of March already???
This is a project my partner teacher came up with while we were co-teaching Kindergarten. We hung them all in the hallway outside our classroom to display during the month of March. It goes along with the popular saying, "In like a lion & out like a lamb," in regards to March weather. I talked to M1 about the concept of this common weather phrase, she understood the basics & really just wanted to make a lion! I intended on painting her hand (both brown & black) & stamping it on the paper to create the bodies but she "really didn't want her hand painted mom!" So that's when the construction paper came into play. But painting would be a fun option if your child is felling up to it. 
Supplies - *White, Black, Brown, Yellow Construction Paper, *Scissors, *Glue, *Several Cotton Balls, *Black Marker, *Google Eyes, *Brown Pipe Cleaner
1. Begin by tracing your child's hand on the black paper (lamb) & on the brown paper (lion). Cut out each of the hands.
2. Allow your child to begin gluing the cotton all over the lamb. Before we started gluing, M1 also helped me break the cotton balls apart a bit so they weren't so bulky.
3. Glue one google eye on the head (aka thumb) of the lamb.
4. Glue the lamb & blank brown hand onto a large piece of white paper.
 
5. Draw a small lion face on the thumb of the brown hand, adding the google eyes.
6. Cut out several (10-12) small yellow strips of paper & allow your child to place them around the lion's head to creat the mane.
7. Trim the brown pipe cleaner to the appropriate size & help your child glue it to the back of the lion.
 
8. M1 wanted to add grass to her picture, so she created some of her own using a green crayon. Clouds, a sun & some other scenery could be added also. Once the grass was done, M1's attention was completely spent... on to the next activity!

A fun project to complete just as March is about to leave us & go "out like a lamb!"

Enjoy! s.b.

3.29.2010

Easter Bunny Dinner Buddy

Isn't this guy so cute? He's the perfect dinner companion for M1 & definitely created some great conversation at the table. My inspiration for this little friend can be found HERE. I do not own a sewing machine nor do I have all that felt so, I decided to use materials I have in our house to make something very similar & way less work! M1's assistance was fairly minimal for this project. She did stand right next to me the entire time & definitely had fun helping me put the pieces together.

Supplies- *1 White Pillow Case, *White Card Stock (or anything a little heavier than normal), *Black & Pink Construction Paper, *2- 7in. Pieces of Black Ribbon, *Glue Gun, *Scissors.

1. I started by cutting out two large ears. I just cut out two tear drop shapes by hand, using the pillowcase to judge for appropriate size. They ended up being approx. 11 inches tall.
2. Cut out two matching pink tear drops that are just a bit smaller than the white. Glue them onto the white "ears."
3. Now for the little pieces. Using the black paper, cut out two egg shaped eyes (Length-3 inches) & six skinny wiskers, each about 5 inches long. Then with the pink, cut two circles & a triangle nose. And finally, using some of the white paper scraps, cut out two small circles for the center of the eyes.
4. Now that all the cutting is finished, you can start putting your bunny together. Start by gluing the ears onto the top, closed side of the pillow case. Continue on gluing the remaining pieces of the face into place.
5. Once the glue is all set & dry, go ahead & pull the pillow case on over the back of a chair. If the case is a bit too long like mine was, just fold the excess under.
Fairly easy & doesn't involve any sewing, just the way I like it!!
Enjoy! s.b.

3.25.2010

Paper Egg Wreath

I had no idea a wreath made entirely of paper could turn out so cute! In fact, I wish we had made a few more so we could give them to each set of Grandparents as little Easter gifts, which I still may do. I hung this wreath right on the front door & it looks very festive. Even better is the fact that both M1 & M2 did their part for this one.
Supplies- *Paper Ring (Made using a piece of white paper or a paper plate), *Pastel Colored Construction Paper*Scissors, *Glue, *Dot Painters, *Large Egg Shaped Cookie Cutter, *Pencil, *Small Piece of Bright Colored Ribbon (not pictured)
~The dot painters were purchased @ Michaels. They are very similar to bingo daubers but come in fun colors. If you do not have dot painters, you could cut out small circles using construction paper to get a similar look or have your child decorate the eggs with markers, stickers, or whatever else you can find.
1. Start by cutting out the white paper ring. Ours was approx. 10 1/2 inches in diameter.
2. Use the cookie cutter to trace 13-14 egg shapes on several different colored pastel construction paper. (Again, if you don't have an egg shaped cutter, you can always cut them out free hand.) Cut out the eggs.
3. Then the eggs are ready to be decorated. We gave both M1 & M2 a chance do paint the dots on the eggs. It was fun for them use the different colors to "dress up" the eggs.
4. After allowing a few minutes for the paint to dry, begin gluing the eggs around the white ring. Remember to alternate colors. We chose to leave one of each color egg undecorated so there would be a break in the polka dots. M1 helped me choose the pattern, never letting two of the same color touch.
5. Use a scissors or hole punch to creat a small hole at the top of the wreath. String the ribbon through the hole & knot.
6. Hang from a door, in a window or where ever you wish.
A great project for the weekend, Enjoy! s.b.

3.24.2010

Mod Podge Message Center

Ok, so s.b.creatively is the place to visit when you're looking for something fun to do with your children but I'm beginnig to think the adults need some fun too! I have several "me" crafts that I'll post periodically so the fun doesn't stop here!
This message board was created in an effort to hide an old, ugly & unused phone jack that I have in the middle of my kitchen wall. It's in a really odd spot & after months of looking, I had zero luck finding anything that fit in the area without looking too big or too small. I was looking for something other than a corkboard that would have the ability to display random invitations, announcements, notes & pictures that we receive throughout the weeks. A good friend of mine had something in her home with strings & clips that I loved, so I was determined to have the same idea but using an unfinished frame that I had found. This is what I came up with....
  Personalized for our family...
1. I bought an unfinished wood frame for fairly cheap @ Michael's (with a coupon of course). The frame is approx. 19 1/2 in by 23 1/2 in. Using a few supplies; the frame, tons of magazine scraps, a foam paint brush, my fingers & some Mod Podge I went to work decoupaging the entire thing. If you're wondering how, find decoupage directions HERE. I used small scraps from tons of random magazines & catalogs. I've definitely gotten into the habit of ripping out pages as I'm reading magazines when I spot a fun pattern. I store them in an old shoe box to be used on my next degoupaging project. Finally, after a few hours of fun in my basement, I was finished with all of the decoupaging & ready to screw in the eye hooks.
 
2. I found these small eye hooks in a picture hanging kit in my basement. I'm assuming you can find them at any hardware or craft store. I used four of them, two on each side. They were fairly easy to screw into the frame, but if you're having a hard time you could use pliers to hold on to each eye hook while twisting it in.
3. Then I came across a random piece of red, plastic-like string (also in the picture hanging kit). I cut two pieces, each about 18 in. long & fastened them to the eye hooks by knotting it on each side a few times. Trim off any access string as seen in the picture below.
4. And finally, I ventured to the fabric store to find these little clips to use for hanging. I found them in the isle with all of the window hanging supplies. I chose the smallest ones they had & they worked great. There is a small gap in the hanging circle that allowed me to just slip them on over the string w/o having to disconnect the string.
The entire project took a few hours but I'm in love with the end product! I've done them as gifts for friends too. I added a picture below of one that I did recently for a friend, but on a cork board instead. (I did block out the name @ the top) It's a fun, different way to display instead of having everything on your refrigerator. It can be hung in a kitchen, home office or even personalized for a child's bedroom.
Hope you decide to give it a try too! Enjoy, s.b.

3.22.2010

Cereal Box Easter Basket


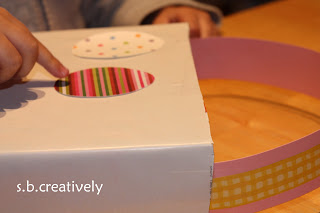
We're definitely in full Easter mode here @ our house. M1& M2 are looking forward to two Easter Egg hunts while visiting their Grandma this coming weekend. Which brings me to my first Easter project. Who would know this cute little creation was made using a cereal box? M1 has been carrying her Easter basket around for days, gathering all sorts of things. The grass is all over the house & it has surprisingly M2 has not demolished it just yet! This project involves a few "mom" steps & leaves the decorating & filling for the little ones. (As always, depending on the age of your child, you can make this as assisted or independent as you wish.)

Supplies- *Cereal Box, * Scissors, *Wrapping paper (with white on the unprinted side), *Glue, *Easter/Spring Stickers, *Pastel Paper, *Patterned Paper Scraps, *Scotch Tape *Small Egg Cookie Cutter (opt.), *Bright Colored Foam Shapes (also, opt.)
Begin- 1. Cut the cereal box in half, making it as deep or shallow as you wish. The bottom half of the box works best as a basket since it has not been opened.
2. Wrap the bottom of the box with the wrapping paper & tape, (printed side in) leaving a blank box to decorate. (Pictured above & below) If you have cute pastel printed wrapping paper, that too would make a cute background to decorate. It doesn't have to be white, just what I had.
3. Cut a long strip of any solid colored paper to use as the handle. (approx. 1 1/2 in.) I fastened a skinnier piece of patterned paper on top of the solid to dress up the handle a bit.
4. Secure the handle to the inside outer sides of the box using scotch tape.
 
5. Now this is where I used the patterned paper scraps & the cookie cutter. I traced & cut out a few (4-5) different patterned eggs that M1 could use to decorate her basket. If you don't have an egg cookie cutter, you could cut them free hand.
6. Allow your child decorating time using the paper eggs, stickers, foam shapes & whatever else you wish. Markers/crayons could also be used to create some character.

7. After the decorating is complete, allow some time to dry.
8. Add grass, a few colorful eggs & you've got yourself one cute basket!
 
Enjoy! s.b.

3.19.2010

Get a Head Start for Earth Day


Tomorrow (March 20th) is the day that the United Nations & many other countries mark as Earth Day. Although here in the U.S. we don't actually celebrate Earth Day until April 22nd, I thought I'd share a quick post on how we can reduce & reuse all year long! I have a few other Earth Day art activities that I'll post as we approach April 22nd. But for now, let's celebrate with the others.

Here is a fun way to reduce kitchen garbage by reusing all kinds of things in your child's pretend kitchen. Above are a few pictures of M and M's play kitchen with all of their "stuff" in it. All great examples of how to reuse daily household garbage & add to your child's pretend play at the same time.
1. In an attempt to keep things somewhat organized, I reused shoe boxes to keep all of their small food pieces together & create a home for all of the dishes. I reinforced the boxes with pieces of packaging tape, which has extend their shelf life & kept them from coming apart from daily use. I printed the words "food" & "dishes" on the boxes so M1 could keep things in their place & it helps make it easier to find things.
2. I also kept a bunch of "garbage" from the kitchen so the girls would have some real-looking food items to play with. Obvoiusly some of them had to be washed out & cleaned up a bit before they made their way into the kitchen. Examples include milk cartons, graham cracker boxes, empty spice containers, small cereal boxes, egg cartons, baby food jars, & other plastic food containers work great. Both girls also enjoy grocery shopping in their kitchen by loading up their big plastic shopping cart.
3. Larger plastic containers, (like the yogurt one seen above) also double as great utensil holders. And an empty dish soap bottle for doing the dishes!
Do you have any fun ideas for reducing, reusing & recycling that includes your children? Share them by leaving a comment below. I look forward to hearing your ideas. Maybe some new Earth Day blogging opportunities?
Enjoy! s.b.

3.16.2010

Crazy St. Patty's Day Hat & Lunch...


We made it to the park today.... yes, it was 60 degrees & beautiful! But it looks like it's just a tease, by Sunday we're supposed to see snow again... sigh. Earlier today while enjoying our time outdoors at the park, we saw a boy with a green St. Patrick's Day hat on. It was one of those thin plastic ones that resembled a top hat. When M1 saw the hat she wanted it so badly.  I resolved the issue by telling her that when we got home we could make a St. Patricks Day hat of our very own. This is what we came up with. (Not our best work, but she was fairly excited about it.)

Supplies- *White & Green Construction Paper, *Glue, *Green Paper Scraps/Magazine Scraps, & Stickers (for decorating) *1 Green Pipe Cleaner (Not picutred), *Shamrock Cookie Cutter (for tracing), *Tape, *Scissors, Green Marker and/or Crayon

To Begin- 1. Fold the green paper in half (to create two shamrocks) & trace the cookie cutter. (Pic #2) Cut out the shamrock.
2. Cut the pipe cleaner in half & tape the ends to the back of each shamrock. (Pic #3) Set aside.
3. Using the white paper, cut out a long rectangle (About 3-4 inches wide). My paper was not long enough to fit around M1's head so I attached another piece to the end using tape to make it the right length.
4. Give your child a few minutes to decorate the long rectangle. (Pic #4) M1 chose to draw all over the paper first & then begin gluing on all of the green scraps we came up with. We had stickers, random green magazine clippings & some green foam hears that we made into a shamrock. Allow some drying time before moving on to step 5.
5. Using the tape, fasten the rectangle into a circle that fits on/around your child's head.
6. Tape the pipe cleaners onto the inside front of the hat & you're done! Enjoy.

And....Here is a quick glimpse of M1's green lunch from today. We pretty much started celebrating late this morning right after creating the festive hat. Seeing her excitement wearing the hat around, I decided to go ahead & make her a green lunch... complete with green milk, a shamrock sandwich (cut out using our cookie cutter), green pear & some edamame. We'll continue tomorrow morning with shamrock shaped pancakes & green milk again (It was a hit... so tomorrow morning I'll be able to make it a bit darker green. I held back this afternoon not knowing what she'd think of it.). We're also planning on making green rice krispy treats tomorrow to keep the celebration going. Sounds delicious!

Check back later this week for an early Earth Day Post...

3.15.2010

Sweet Shamrock Tortilla Chips


I found this little recipe on the Family Fun website. The recipe can be found HERE. We changed it a bit by using a shamrock cutter vs. the animal cutters. Way more festive! We also added cinnamon sugar to the chips instead of salt. These could be made year round using all kinds of cookie cutters!

The finished snack turned out great & it was such an easy, quick baking experience for M1. Very little mess, minus dumping cinnamon sugar everywhere! Both girls gobbled these up. They would be great dipped in vanilla yogurt. I wish I had thought of that earlier. We'll have to give it another try in a day or two with the remaining tortillas. Enjoy!

3.11.2010

Paper Plate Clock

 
Like what you see? Visit my guest blog post here @ Mom4Life Blog this morning for the full tutorial. Heather's blog is a great place for any mom to explore. Or if you're looking for unique products for expectant mothers, dads, babies & more visit her website Mom4Life. She has so many great products including the Libby Dibby necklace that many of you have seen me wearing with M1 & M2's names stamped on the charms. Happy Daylight Savings Time this weekend! Enoy! sb

3.10.2010

Paper Plate Pot of Gold


M1 calls this her Pot of Gold Purse... I guess it does resemble a purse a bit. Lots of steps but a great finished product. Give it a try!

~Supplies: *Paper Plate, *Glue, *Scissors, *Stappler, *Black Paint, *Paint Brush *Cardboard (cereal box), *Yellow Construction Paper, *Glitter (optional), *Black Sting/Ribbon

To Begin - 1. Cut  the paper plate in half through the middle & staple together around the outside edge. (Picture #2)
2. Allow your child to paint both sides of the "pot" black using a small paint brush. I layed out some paper underneath, it was a bit messy!
3. While the paint is still wet, sprinkle glitter on the pot & allow to dry.
4. As the pot is drying, create the "gold" using the yellow construction paper & cardboard. (We used a Cheerios box since a large part of it was already yellow.) Cut out 1-2 inch circles around the box. Cover the  brown side of the coins with yellow construction paper. (Finished coins in Pic. #4) Another option would be  to paint the coins yellow. Either would be fine.
5. Tape/tie the ribbon to each corner of the pot & have fun carrying it around!

3.08.2010

Leprechaun Hat


St. Patricks Day is creeping up on us & I need to get the crafts going! Here we created a tiny leprechaun hat  for "Teddy." M1 thought it was so funny that Teddy had a leprechaun hat on his little head. In fact, Teddy has been sharing the hat with all the other animals/dolls in the house. They've all tried it on! Many more fun St. Patty's Day things to come... check back over the next week & a half.

~Supplies: *1 Toilet Paper Roll, *Green Tissue Paper (Check your Christmas bags/paper), *Green construction paper *Scissors, *Glue, *Small black strip of felt (You could use blk paper), *Small yellow foam square (Again, use what you have if you don't have foam) *Cardboard (We used a cereal box)

To Begin - 1. Cut the tissue paper into small 1-2 inch squares.
2. Begin by placing glue all over the roll & allowing your child to place the green squares all over the tube until it is covered & green. (Pic. #2) When she was done, I folded the edges that hung over inside the tube.
3. Glue the black strip around the bottom of the green tube & add the yellow "buckle" over the top. (Pic. #3)
4. Cut out a circle using the green construction paper. (Approx. 4in. diameter) This will be the base of the hat. Once you've got a good size circle, glue it to the cardboard, (Pic. #4) & cut it out.
5. Place a large amount of glue around the bottom of the toilet paper roll. (Right along the black belt near the bottom.) Place the "hat" onto the green base & allow at least an hour  for the glue to set.
6. Try the hat on all your family friends around the house! Enjoy. s.b.