Showing posts with label Winter. Show all posts

3.01.2011

Read Across America Activities

For those of you wishing to participate in Read Across America tomorrow & the rest of the week, here is a link to some great Dr. Seuss activities to do at home with your little ones.
A handful of fun pritables including coloring pages, tic tac toe, a maze & much more. I've printed a bunch of activities for M1 & M2 to do on Wednesday during our reading day. (Like every day isn't a reading day??!!) I know they'll have fun with all the different activities especially since a few of them include  Cat from Cat in the Hat, which they both really enjoy. (We watch the t.v. show each morning & they LOVE the book.)
Enjoy & Happy Reading! s.b.

2.08.2011

Heart Mitten Garland

I found the inspiration for this adorable craft HERE on the blog Two Straight Lines. I thought it would be a fun project for M1 & I to do together. After we started, I quickly realized it was a bit difficult and ended up doing most of it myself. M1 definitely helped & it turned out great!

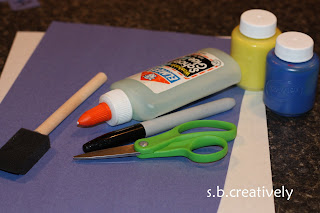
Supplies- Red/White Construction Paper, Newspaper, Glue, Red Ribbon, Scissors, Hole Punch
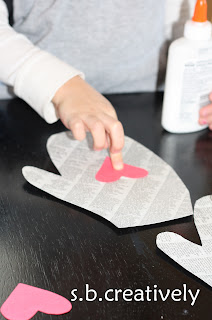
1. Cut out several (we did 7) mitten shapes. I just did this free hand but if you're interested there are 100's of templates on the web. The mittens are approx. 8 inches long.
2. Because the newspaper is very flimsy, I glued each of the mittens onto white construction paper & cut them out as well to reinforce them a bit.
3. Using the red construction paper, cut out as many small red hearts as there are mittens.
4. Glue the hearts onto the mittens. M1 was glad to finally be able to help a bit!
5. Use the hole punch to punch out holes around the exterior of each mitten. (Another step that M1 enjoyed... they really liked all of the small circles that the hole punch created. Homemade confetti!)
6. String the red ribbon through the tops of each mitten & you're done!
We hung ours in the entry to our sun room & it looks great.
Definitely a fun winter-like Valentine decoration.
Enjoy! s.b.

1.23.2011

We Love Our Green Bay Packers!!

We are Green Bay Packer Fans so today is a big day! We're having a group of friends over for the game & M1 & M2 are SOOOO excited for the party and to wear their dresses yet again! We're hoping that this isn't the last game of the season & that we get to cheer on our favorite team in the Super Bowl in a few short weeks.
Last night we made these green & gold treats for all to enjoy....
And a few days ago we crafted two of these paper bag footballs...
                                    
*The rice krispie treats were made using the regular recipe. We made two batches adding green & yellow food coloring to the marshmallow/butter mixture before stirring in the rice cereal.
Therefore... you could customize these yummy treats to match the colors of your favorite team as well :)

*The football was crafted using these steps...
1. Cut a brown grocery bag into the shape of a football. (You can make it as large or as small as you wish.)
2. Allow your little one to cover the paper with brown paint & give some time to dry a bit.
3. We used a few pieces of black duct tape to create a few small strips for the laces. (Other things you could use include electrical tape, masking tape or white medical tape... the actual laces on a football are actually white :)
4. Place the strips as seen above onto the football to create the appearance of laces.

Football fans enjoy the remaining games & Go Packers!!
Enjoy. s.b.

1.18.2011

Craft Stick Snow Sled

Lots of snow here @ our house & it just keeps coming. Gotta love winter :) Snow or not, this is a great winter craft for all....
Supplies- Glue (We used Tacky Glue, it works best), Scotch Tape (optional... thought we might have needed it, but didn't!), Ribbon & 7 Craft Sticks
1. Place a thick line of glue across one of the craft sticks & lay it horizontally.
2. One by one, begin placing 5 of the craft sticks across the horizontal stick. I guided M1 a bit so the sticks were staggered to look like a sled, not just straight across.
3. Glue another horizontal line across the craft sticks, right about the other horizontal stick.
4. Place the 7th stick across the glue line.
5. Cut a strip of ribbon about 8 inches long.
6. Dab two large dots of glue right about the horizontal craft stick & place the two ends of the ribbon onto the glue.
7. Allow a few hours to dry completely.
This is what we've been using our sled for here @ our house. M1 & M2 drag their little dolls around on it, it's hilarious! I love their little imaginations.
Enjoy! s.b.

1.11.2011

Q-tip Snowflakes

It's well known that Q-tips are great for everyday use, but did you know they make great snowflakes as well?!
I know you've all got some in your bathroom so go dig them out & get crafting!

Supplies- Q-tips, Glue, Scissors, Blue Construction Paper, (the tape is optional)
1. Leave a few of the Q-tips whole & then begin cutting the others in half.
I cut some in half, some a bit shorter than half & a few right under the cotton swab so they are all different lengths.
2. Begin drawing lines with the glue on the blue construction paper. (Pictured below.) One line at a time.
3. Place the various Q-tips onto the glue lines beginning with the center (whole) Q-tip & then adding the cut ones afterwards.
4. It's important that you put enough glue on the paper so that the Q-tips will dry into the glue. It's a mess @ first but it all dries clear!
5. Repeat with each snowflake. (We chose to do three.)
6. Allow a few hours for the glue to completely dry.
7. We chose to add a few foam letters to jazz up our snowflake picture for Daddy so he could hang it in his office.
All done!
Have fun & enjoy! s.b.

1.04.2011

The Mitten Activity

I wanted to share a cute craft/activity that M1 brought home from school. I'm sure most of you have read The Mitten by Jan Brett. It's a favorite at our house along with Gingerbread Baby. I thought this was such a cute idea & M1 really enjoyed it. Her mitten has been played with for days. M2 enjoyed it as well, especially after reading the story many times.
Here is the story in case you haven't read or heard of it...
And here is her mitten.
At home I would cut out two mittens using colored construction paper & staple them together around the outside edge, leaving the opening to the mitten unstapled.
(They were able to get the image of the mitten on the construction paper using a copy machine. You my be able to put colored paper in your printer as well :)
 
Then simply use your computer to search for images to print out the animals of the story. (bear, raccoon, owl, fox, bunny, etc)
Cut them out & allow your little one to color them before placing them into their mitten.
 
Such a cute & easy craft that pairs well with a great book. Both of my girls are big into books so this was definitely a hit! M1 reads the story as M2 places the animals into the mitten.
It's snowing her today... we're crafting some fun winter stuff & drinking hot chocolate.
Enjoy! s.b.

12.08.2010

Paper Plate Wreath 2

Here is M2's wreath...
Supplies- Paper Plate (with the center cut out), Green Tissue Paper, Red Construction Paper, Small Piece of Ribbon, Scissors, Scotch Tape & Glue

1. Cover the paper plate with glue.

2. Cut a few dozen 1 inch squares of green tissue paper. Place them in a small pile near your little one.
3. Begin placing the tissue squares all over the paper plate until it's completely covered. (Or to your little one's liking!)

4. Cut out 10-12 small red circles using the red paper.
5. Glue them around the wreath where ever you wish.

6. Trace two small hands using the red paper.
7. Cut out both hands & glue them to the bottom of the wreath facing down for the "ribbon."
8. Attach a small piece of ribbon (for hanging) to the back of the paper plate with scotch tape.
Done! A cute little holiday decoration for your own home or to give as a cute home-made gift!
Enjoy! s.b.

Paper Plate Wreath

Both girls have been begging me to craft with them lately... must be due to the small decline in crafting while we were living with Grandma & moving. I'm not nearly as organized as I was in the last house but we're getting closer. For now, being slightly unorganized makes the whole process a bit more challenging!

Yesterday we made Paper Plate Wreaths... it ended up that each of the girls crafted a slightly different wreath than the other, so I'll post them as seperate posts instead of one long post. Here is M1's wreath...

Supplies- Paper Plate (with center cut out), Green Paint, Paint Brush/Sponge, Red, Yellow & Orange Construction Paper, Red Buttons, Sequence, Etc., Small Piece if Ribbon, Scotch Tape, Glue, Scissors.
1. Paint the paper plate green. Allow a few mintutes to dry.

2. While drying, gather all of your wreath decorations... we used small red paper circles (that we cut out), red buttons, red/green sparkly pom poms & red sequence.
3. Once dry, begin glueing all of the decorations onto the wreath.

4. Cut out a small red rectangle, (Ours is 3in. by 1.5 in.) a large orange "flame" shape & a small yellow "flame." *Pictured below.

5. Assemble the flame by glueing the pieces together.
6. Fasten the flame to the back of the wreath so it shows through the middle using scotch tape.

7. Next, fasten the ribbon to the top, back of the wreath using tape as well.
8. Allow ample time to dry so your heavier objects (like the pom poms if you have them) have time to dry & they don't fall off :)
Enjoy! s.b.

12.02.2010

Handprint Menorah

Happy Hanukkah to all! The teacher in me loves to teach the girls about all kinds of Holidays, even those we may not personally celebrate. I have several Jewish friends, so Hanukkah just happens to be one that I know a little more about. This is a project I did during my preschool teaching days (A part time gig that I did while prego with M2). The finished product is just so precious...

Supplies- Blue & White Construction Paper, Blue & Yellow Paint, Paint Brush, Black Marker, Glue, Scissors.
1. Paint one little hand blue & stamp onto the white construction paper.
2. Repeat with the opposite hand being sure to overlap the thumbs (pictured below)... the menorah only needs 9 candles. Tricky when we've got 10 little fingers!

(Overlapping thumbs)
 
3. Use a fingertip & dip it into the yellow paint.
4. Stamp a yellow print on top of each of the 9 fingers or "candles."
5. Cut 13 small blue squares & print each letter of HAPPY HANUKKAH on each square. (As pictured below)
6. Scatter the letters in front of your little one (Assuming they are old enough for letter recognition).
 7. One by one spell out HAPPY HANUKKAH for your little one & allow them to find the correct letter in the pile.
8. Glue on each of the letters one-by-one as they find them.
 And you've got a Menorah!
 Enjoy! s.b.