Showing posts with label Sports. Show all posts

3.22.2011

Basketball Hoop

NCAA Basketball continues Thursday. M1 & M2 don't have a choice if they want to watch or not... their daddy is in charge of the t.v. when the games are on :) They've gotten into it a bit & enjoy cheering for the teams that their dad needs to win for his bracket!
Here M2 & I created a basketball hoop making it up as we went... it resembles a hoop right??!!

Supplies- Blue/Red/White/Black Construction Paper, Glue, Scissors, Black Marker, Ribbon, Red Pipe Cleaner, Orange Foam Circles (Alt. Orange Construction Paper)
1. Use an entire piece of blue paper as the base of the hoop.
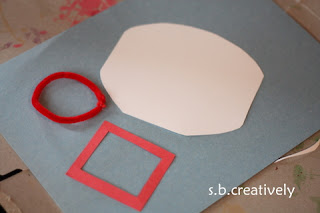
2. Use the white construction paper to cut out a backboard (pictured below).
3. Use the red paper to cut out a small red square for the back board & also a red circle to be used for the hoop. *We used a red pipe cleaner & made it into a circle.
4. Glue the white back board to the upper half of the blue paper.
5. Cut a thin black strip of paper for the basketball hoop pole.
Glue it underneath the back board.
6. Glue the red square on top of the back board.
7. Glue the red hoop right underneath the back board as pictured below.
8. Cut the white ribbon into small strips & begin gluing them underneath the hoop to create the appearance of a net. (If you don't have white ribbon, you could cut small strips of white paper to achieve the same look.)
9. With the black marker, draw the lines of a basketball on the small orange circles.
(We used foam circles but orange construction paper circles would do the trick as well. Lots of options here!)
10. Glue the basketballs around the hoop where ever your little one desires.
And there you have it... a basketball hoop.
M2 was so very proud of this & couldn't wait to show daddy & M1 when they got home. She'll be parading around the house with it once the games start up again I'm sure!
Enjoy! s.b.

2.04.2011

Peanut Butter Football Cookies

As many of you know, we've got the Green Bay Packers & the Super Bowl on our minds. Only a few more days until the big game!
Last night @ my mom's house we made some yummy peanut butter cookies in the shape of footballs...
We used this recipe from Allrecipes.com Chewy Peanut Butter Cookies
(Added bonus, no dairy in the cookies so M1 can enjoy an unfrosted one as well!)
We shaped the balls into small ovals & then pinched the edges before putting them in the oven & they definitely took the shape of footballs while baking.
Next, we frosted them with store bought chocolate frosting...
Mixed up some white piping made with a mixture of powdered sugar & water.
Mixed well until the consistency of toothpaste & piped on some "strings."
(*I bought the "ketchup-like" bottle @ Michael's for super cheap... it works so well for frosting cakes & cookies.)

They turned out super cute. We can't wait to eat & share with friends on Sunday evening.
 
Will you be watching the Super Bowl come Sunday? Cheering for the Packers as well??!!! 
Enjoy! s.b.

1.23.2011

We Love Our Green Bay Packers!!

We are Green Bay Packer Fans so today is a big day! We're having a group of friends over for the game & M1 & M2 are SOOOO excited for the party and to wear their dresses yet again! We're hoping that this isn't the last game of the season & that we get to cheer on our favorite team in the Super Bowl in a few short weeks.
Last night we made these green & gold treats for all to enjoy....
And a few days ago we crafted two of these paper bag footballs...
                                    
*The rice krispie treats were made using the regular recipe. We made two batches adding green & yellow food coloring to the marshmallow/butter mixture before stirring in the rice cereal.
Therefore... you could customize these yummy treats to match the colors of your favorite team as well :)

*The football was crafted using these steps...
1. Cut a brown grocery bag into the shape of a football. (You can make it as large or as small as you wish.)
2. Allow your little one to cover the paper with brown paint & give some time to dry a bit.
3. We used a few pieces of black duct tape to create a few small strips for the laces. (Other things you could use include electrical tape, masking tape or white medical tape... the actual laces on a football are actually white :)
4. Place the strips as seen above onto the football to create the appearance of laces.

Football fans enjoy the remaining games & Go Packers!!
Enjoy. s.b.

6.25.2010

Craft Stick American Flag

We'll be heading up north next week for the 4th of July so I'm not sure if I'll be posting. No worries, we'll be back the following week with more crafts! Here is our 4th of July door hanging that M1 created this week. It looks great hanging on Grandma's front door & very festive. And this year we're not only creating RED.WHITE.BLUE to celebrate Independence Day but also World Cup Soccer!! We're so proud of our good friend Jay (#15 so you can cheer extra hard for him!!!) & the US team. We are looking forward to the game on Saturday!!!
Supplies- *Craft Sticks (9), *Red, White & Blue Paint, *Paint Brush, *White Paper, *Small Square of Cardboard, *Ribbon, *Scissors, *Glue, *Star Hole Punch
1. Begin by painting the craft sticks.  
***2 sticks-red, 2 sticks-white, 3 sticks- 1/2 red 1/2 blue, 2 sticks- 1/2 white 1/2 blue
As seen below...
2. While the sticks dry, begin covering the cardboard square with glue.
*Our piece of cardboard was 3inches by 3 1/2 inches.
 
3. Once the cardboard is completely covered with glue, begin placing the painted craft sticks into place one by one.
 
4. Using the hole punch & the white piece of paper begin punching out as many stars as you'd like.
*If you don't have a star punch, your little one could create the star look by dipping their finger in white paint & stamping it onto the blue portion of the flag. Cut out stars or stickers would work also.
5. Glue the stars onto the flag & allow time to dry.
6. Once dry, glue or tape the ribbon to the back of the flag so it can be hung where ever you wish!
Enjoy & Happy 4th of July!!!
Go U.S.A.

6.10.2010

Go U.S.A.!!!

We're two days away from the big match between U.S.A. & England... so why not continue crafting to show some spirit?! Today M1 & I made a U.S. flag to keep up with the festivities. It's a great independent project for kids of any age. M1 did not do the cutting for the project, but an older child could absolutely do that on his/her own. She did enjoy gluing on the shapes & creating a flag of her very own. I enjoy how excited she is each time we finish a project... definitely very proud of her work!
Supplies- *Red, White & Blue Construction Paper, *Glue Stick,  *White Paint, *Scissors, *Pencil (Used to trace the lines for an older child to cut along.)
1. Cut out five long, 1 inch strips of red paper.
2. Cut one large blue square, set aside.
*While I was doing the cutting for the project, M1 sat at the table with me & did a little cutting of her own. She could cut up pieces of paper all day long...

3. One by one, glue the red strips & place them onto the white paper leaving a little space in between each strip.
4. Glue the blue square into place. (Upper left corner)
5. Using the little one's finger, begin dipping it into the paint & stamping on the "stars."
(I drew small dots in a line along the blue paper as a guide for M1 when stamping her prints. It helped her keep them in a somewhat straight line.)
6. Allow some time to dry. (Sorry for the blurry picture below!)
Done! We'll definitely be bringing out our flag on Saturday while we cheer on the USA during their match against England. Between the flag & the soccer balls the girls created we'll be all set!
ALSO... One of my blog readers (Who lives in South Africa right amongst the World Cup action!...) did a similar project with her little one using sheets of colored foam. Below is a picture from HER BLOG of her little one with their S. African flag. Be sure to check it out.
It's so fun for little ones to use different materials when crafting. M1 would have been thrilled to use foam for this project but I don't have any at the moment.  So fun!
Bring on the weekend, we're looking forward to cheering for #15! Go U.S.A.   
Enjoy! s.b.

6.08.2010

World Cup Time!!!

Our house is REALLY excited for the World Cup to start this week. One of my close friends (#15 Jay Demerit) is playing on the US Soccer team & we can't wait to watch him! It's a bit too far for us to travel right now to watch live but we've been reading articles, watching the pre-world cup games, etc. It is so fun to see him & all he's accomplished. So in honor of this rare & exciting event, the girls & I created soccer balls today.
This post is a bit lengthy. I started by creating a soccer ball with M1 & then went on & made the project a bit easier for M2.
Supplies- *Black Paint, *Black Marker, *White Construction Paper, *Cardboard (optional),*Sponge, *Craft Sticks, *Glue, *Not Pictured-Scissors & A Bowl for Paint
1. I began by creating the below pentagon template using a Word document. You should be able to right click on the image below & save it to print for your own use. 
2. Then I cut out one of the pentagons, traced it onto the sponge as seen below & cut it out.
3. Using a large piece of white construction paper, cut out a circle to be used as the ball. (I also cut out a cardboard circle the same size & glued the two circles together to make it a little less flimsy.)
4. Pour a small amount of black paint into a bowl.
5. Using the pentagon shaped sponge for dipping, have your child dip it into the bowl & coat with paint.
6. Stamp a half dozen or so pentagons onto the circle ball.
 7. Once the soccer ball is filled with pentagon stamps, allow some time for the paint to dry.
8. Once dry, use the black marker to connect the pentagons with straight lines. I definitely had to help M1 with this a bit, but once we got started she got the idea.
9. Glue the craft stick to the bottom for a handle & allow to dry. Done... with the first one, not on to M2.
Once M1 was done with her soccer ball, I gave her the print out of the pentagons & gave her a few minutes to stamp the remaining pentagons with black paint. (pictured below) It was a great activity for her to match up the sponge stamp with the shape. She really enjoyed it.
Once these pentagons dried, I cut them out & helped M2 create her own soccer ball also. Instead of stamping with the sponge, I helped her glue the cut out pentagons onto a circle of her own. She was so happy & loves to get messy with the glue.
We drew the connecting lines together, added a stick handle, let it dry & they were all set. Definitely ready to cheer on Jay during Saturday's match against England!!!
 
Enjoy! s.b.

4.05.2010

Cork Stamp Basketball

We're down to the wire with all of this March Madness Basketball & tonight is the big game. M1 & M2 have enjoyed many basketball games with Dad over the past few weeks. A few too many for my liking! Even though I'm almost all basketballed out, to keep with the spirit we had to make time to create a basketball.

Supplies: *Orange Construction Paper, *Black Paint, *Marker, *Scissors, *A Cork

To Begin - 1. Cut out a large circle using the orange paper.
2. Draw the basketball lines on with your marker. The lines will be the guide once your child starts stamping. (Picture #2 shows the lines if you've forgotten what they look like.)
3. Pour a small amount of black paint into a bowl. Allow your child to begin "stamping" along the black lines using the cork as the stamper. Continue until all four lines are covered with stamped circles.
 
4. Allow to dry & display.
 
Have fun watching the game tonight if you're a fan.
Enjoy! s.b.

2.21.2010

Paper Ice Skate


I think this will be the last of the Olympic crafts, but one never knows... maybe I'll dream something up this week. With ice skating all over the t.v. we've been talking about it daily, so this seemed like a perfect project for the weekend. We also went skating downtown as a family last weekend. M1 was very happy to decorate her skate & string the skate laces "all by herself."

~Supplies: *Blue, white & black construction paper, *Scissors, *Glue, *Crayons or Markers, *String/ribbon, *Hole punch.

To Begin- 1. Cut a boot shape out of the white piece of paper & punch 6-7 holes for the laces. Also cut out a skate using the black paper. (Pic #1)
2. Give your child some time to decorate his/her skate.
3. Once it's decorated, go ahead & let him/her thread the ribbon through the holes. I started by placing the end of the ribbon through the 1st hole near the toe & tied a knot there so it wouldn't slip out. Then I handed it over to M1 to do the rest. (Pic #2) When she was finished I fascened the end of the ribbon to the back side of the boot using a piece of tape. (You could glue it also.)
4. With your child's assistance, glue the boot/skate onto the base paper & allow to dry.