Showing posts with label Weather. Show all posts

4.13.2011

Tornado in a Bottle!

Lots of weather action going on in our neck of the woods lately. This week we've had some pretty severe weather, including a couple tornadoes. Perfect timing since it's Tornado & Severe Weather Awareness Month! The girls managed to sleep through it all but we thought it was still important to talk to them about the situation. My husband is off a few days this week to allow me to spend some time with one of my bf's visiting from Australia, so I thought I'd find an activity for them to do together while I'm out shopping & enjoying some adult time. Here is what I suggested... Tornado in a bottle! (I'll keep you posted as to how it goes... )

It's a classic & a staple in most elementary classrooms.
Supplies- 2- two Liter Bottles, Duct Tape, 1 inch Metal Washer, Water, Glitter, Food Coloring, Scissors, Hot Glue Gun (optional)
(*Images below are all from the web, not my personal pictures)
1. Fill one of the bottles about 2/3 way full of water. Optional- add food coloring to give your tornado color or glitter to mimic debris that the tornado picks up along the way.
2. Place the metal washer over the opening of the bottle
3. Use duct tape to fasten the two containers and the metal washer together. Make sure to make the tape tight so no water leaks out. Optional- I've used a bit of hot glue during this step while making this in my classrooms as well. It helps create more of a waterproof barrier underneath the duct tape.
4. Turn the bottle with water over so that it is on top. Swirl the bottle in a circular motion. A tornado will form as the water rushes from the top bottle to the bottom bottle.  

The finished product should look like this...
If you want to be really fancy & save the time/mess of duct taping the bottles together, you can usually find one of these fun tornado in a bottle "tools" to create the same effect at a local school/teacher supply store.
They are fairly cheap & can be used over & over.

I'd also like to try to create a tornado in a bottle using two smaller water bottles to see if they would work just as well. The bonus is they wouldn't be as heavy as the filled 2 liter bottles... much easier for M1 & M2. Has anyone tried this?
Enjoy! s.b.

5.28.2010

Raindrops With Glue....

I've done a few umbrella & rain projects throughout the past few weeks. I really wish I would have seen this project because I would have added a little "rain" a.k.a glue to some of our umbrella art. I found this HERE on MamaJenn's blog & just love it. So cute & soooo easy. If you don't feel like making this umbrella, I made one HERE that could be used for a similar effect. Just skip the marker rain drops & use the glue in place of them. We haven't had any rain in a few days... I need it to stay away through the weekend & our big MOVE!!!
Enjoy! s.b.

5.13.2010

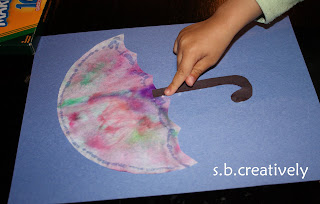
Coffee Filter Umbrella

It's another gloomy day here today... lots of rain & flash flood warnings. Not what I want to hear when we're two weeks away from moving. Wouldn't that be my luck?!  But the rain does give us more reason to create a rainy-day craft. Here is what I put together....

Supplies- *Coffee Filters, *Markers, *Construction Paper (White, Blue, Black) *Tape, *Glue, *Scissors
1. Tape the coffee filter to a large piece of paper or cardboard. This helps it lay flat & makes it easier to color on.
2. Using the markers, color as much or as little of the filter as you wish. Both M1 & M2 just scribbled on their filter, I'm not sure how actual drawings would turn out in the end. Just give your child free reign!
 
3. Once the filters are all covered with color, take them outside & place them in the rain for a bit. (The amount of time outside depends on how hard it's actually raining. At our house it was raining quite hard, so we only left them out a few minutes. Long enough to get completely soaked!) M1 got all dressed up in her gear & brought them out. At least we all didn't have to get wet!
4. Bring the wet filters inside & allow them to dry. *They'll dry a lot faster if you take them off the base paper.
5. Cut the filter in half with some dips to make it look like an umbrella & glue it to the blue construction paper.
6. Use the black paper to cut out an umbrella handle & attach it using glue.
7. Use the markers (blue) one more time to create some rain drops around the umbrella. M2 actually used a blue crayon, it was a bit easier for her to hold.
 
And there you have it, two colorful umbrellas made using the rain itself! So cute...
(M1 on the left & M2 on the right)
Enjoy! s.b.

5.07.2010

Who doesn't love a good Thunderstorm?!

It's raining here this morning & it's supposed to continue ALL day! So why not create something that mimics the weather?! If you're one of the lucky ones with no rain today, this is still a fun & messy craft that little ones are sure to enjoy! I got this idea from a crafty friend of mine...

Supplies- *Paper Plate, *Small Bowls (for mixing), *White Shaving Cream, *Black & Blue Paint, *White Paper, *Small Yellow Paper, *Scissors, *Glue, *Spoon, *Paint Brush, *Tape, *Ribbon (Not Pictured)
1. Pour a significant amount of shaving cream into your small mixing bowl.
2. Add a little under equal parts glue.
3. Pour a small bit of black paint into the mixture (just enough to tint it grey).
4. Allow little hands to mix well.
 
5. Spoon the mixture onto the paper plate. Use the paint brush to spread the grey cloud mix all over, covering the entire plate. *Rinse the brush as soon as they've finished.
6. Set aside & allow a few hours to dry.
7. While the cloud is drying, your little one can get started on the rain drops. Use the blue paint to cover an 8 1/2 X 11 piece of paper & allow to dry. (If your little one is really ambitious, they could paint the other side of the blue paper also. That way when they spin around while hanging, both sides would be blue.)
8. Once it's dry, cut out a few rain drops & use the yellow paper scrap to create a lightning bolt. (Again, depending on the age of your child you could have them do the cutting.)
 
10. Hours later, once the cloud has set- Use ribbon or string to tape hang the drops & lightening bolt from the dark cloud.
11. Hang to display their very own rain/thunderstorm!!
Enjoy! s.b.