Showing posts with label Crafts For Mom. Show all posts

6.23.2011

Hospital Survival Kit for New Mothers (A gift for me!)

A good friend of mine arrived at the hospital after I delivered M3 a few days ago with something very similar to this...
A Hospital Survival Kit for New Mothers! What a great idea!
I was delighted to receive it & immediately wanted to know where she got the idea. (I have friends that still need to have babies!)
She found the idea & even the printables HERE on My Own Road's website.
My goodies were similar to, but not the same as these... you get the idea!
Such a cute gift. I have since went to her blog & checked it out (obviously to do this post!) and there are both girl & boy printables. I can't wait to make a few of these myself!
Enjoy! s.b.

5.26.2011

More Teacher Ideas...

I've found a few more cute Teacher ideas that would make adorable little end-of-the-year teacher gifts that were WAY too cute not to share! I think I'll keep them handy for next year as well. I know from experience that it's always nice getting little things like this from students :)

Below is a "TEA"cher Card. I'd probably print a cute message to post on the front of the tea cup as well...
This idea came from Family Fun. Instructions here..."Tea"cher Card

The next two fun ideas came from The Domesticated Lady. How cute are these water bottles? And what a refreshing idea for all the wonderful teachers out there now that the weather is warming up around the country...those classrooms can get HOT!

And then there's this sweet treat... We definitely do need S'more great teachers!
Link with template...s'more Teachers Like You

Hope your little ones are enjoying the end of the school year & looking forward to summer vacation!
Enjoy! s.b.

5.24.2011

End of the Year Teacher Gift

M1 is officially done with 3 year old preschool this week. Just in time for her 4th Birthday on Monday. According to her, it just wouldn't be right to be in 3K as a four year old!!! Fortunately, in her case it works out that the finishes just days before her birthday :)

I wanted to share the picture frame I crafted for her teacher. She was a nurse for years, stayed home with her kids for many years & then went back to get her teaching degree. So... this year is her first year as a teacher. I wanted to make something special for her. She's a terrific woman & has taught M1 oodles of things throughout the entire year. I'll be delighted for M2 to have her as a teacher in another year.

Supplies- Unfinished Wood Picture Frame, Mod Podge, Craft Paper or Ruled Paper, Hole Punch, Paint Brush, Paint, Alphabet Stickers.
1. I began by painting the frame a dark barn red color & allowed a few min. of drying time.
*I got this frame from IKEA. It was a cheap pack of 3 unfinished picture frames that really come in handy when I'm looking for a quick Mod Podge project. I also regularly buy the unfinished wood frames from Michael's Arts & Crafts. Can't go wrong... they're only $1.00!!!
2. While the frame dried, I went ahead & traced the frame onto my piece of craft paper. (I found a piece of paper @ the craft store that looks like a ruled piece of paper. If you don't have one you could just use a plain ruled piece of paper.)

3. Cut out the rectangle & made it just a bit smaller than the face of the frame so some of the red paint would show around the edges.
*Below I layed it out just to be sure it fit correctly.
4. Use the Mod Podge and apply a layer to the entire face of the frame.
5. Lay the craft paper on top of the face of the frame over the Mod Podge glue. Be sure to press down around the entire frame to get any bubbles out & get it flat.
6. I usually go over the entire surface with Mod Podge one more time once the paper is down to give it an extra layer to secure.
7. Allow an hour or so to dry completely.
8. Use alphabet stickers to apply a message to the frame.
I chose "My First Year" since it's her first year as a teacher. I thought it would make a great memory. Other messages could include "World's Best Teacher" or "I Love My Teacher." You get the idea!
(Also, if you don't have stickers you could use various letters from magazines cut out & glue onto the frame.)
9. Once you've got your stickers in place, apply another thin layer of Mod Podge over the stickers to secure them as well. Allow to dry.
And you're done! What a cute gift... I certainly hope she enjoys it.
I was able to print a picture of the class as well, so it's a finished deal.
M1 is so anxious to give it to her this week & I am still in awe that she's turning 4! Where does the time go??!!
Enjoy! s.b.

9.14.2010

Craft for Moms...Decoupage Recipe Holder

I made this for my mom to replace an old recipe holder that she had sitting out in her house. I thought she could use something a little more pleasing to the eye! It's pretty easy to do... unfortunately, I did not take pictures as I was covering it but I still wanted to share...
I found the unfinished recipe box @ Michael's Arts & Crafts for pretty cheap. (I used a coupon of course!)
I got to work searching through Pottery Barn catalogs & many other magazines looking for fun scraps. I tried to stick with deep red & brown tones so it would match her decor.
Then I started to glue down all my scraps with Mod Podge until the entire box was covered. Finishing by coating the entire box with a polycrylic finish to "seal" it.
 
Since creating this one, I've made a few others. They definitely make cute gifts. I try to stay on the look-out for cute recipe cards to slip into them to complete the gifts. My mom has even made a few as gifts for her friends & my aunt crafted one for each of her children's teachers for Christmas presents. (An idea for M1's teacher too!)
Enjoy! s.b.

7.20.2010

A Craft For Moms...Decorative Fabric Boards

As many of you know, we've moved & are temp. living with my parents until our house is built. (Hopefully done early October...HOPEFULLY!) I crafted these fabric boards while still living in our past house to minimize sound in our long upstairs hallway. I loved the completed project & all three of them will definitely have a home on the wall once our new house is complete. They were fairly easy to make & really reduced the echo in our hallway. Plus, they doubled as decorative wall hangings. I had no need for pictures, etc.

Supplies: *3- 3 1/2 foot squares of plywood, *Cotton batting to cover all three pieces, *A staple gun w/ staples (LOTS of staples!), *3 Coordinating pieces of fabric big enough to cover the wood squares w/ extra for folding over the edge, *Hanging kit for each

1. Lay the fabric, print side down, flat on the floor.
2. Lay one piece of batting over the fabric. Be sure there are no wrinkles.
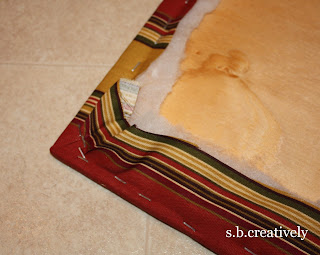
3. Place one of the boards on top of the fabric & batting so the edges hang over.
4. With a second set of hands for help, begin turning the fabric over the wood & stapling it along the edge as you go. Be sure to pull the fabric nice and tight so there aren't any wrinkles when you're finished.
5. The corners get a little tricky, but not too bad. Just continue around the corner stapling down the extra fabric.
 
6. Once you've stapled all the way around & the fabric is completely secure, the hanging comes next. I used wire & two small eye hooks to hang each board. Screw in the eye hooks about 3 inches from the edges of the boards. (Pic. below)
7. Fasten the wire across the back of the board using the eye hooks.
 8. Use a screw or nail to hang the boards on the wall as shown below.

I loved the finished product. I'm thinking about using the same technique to create a headboard once we're moved in. Looking for something different. Any other ideas??
Enjoy! s.b.

3.24.2010

Mod Podge Message Center

Ok, so s.b.creatively is the place to visit when you're looking for something fun to do with your children but I'm beginnig to think the adults need some fun too! I have several "me" crafts that I'll post periodically so the fun doesn't stop here!
This message board was created in an effort to hide an old, ugly & unused phone jack that I have in the middle of my kitchen wall. It's in a really odd spot & after months of looking, I had zero luck finding anything that fit in the area without looking too big or too small. I was looking for something other than a corkboard that would have the ability to display random invitations, announcements, notes & pictures that we receive throughout the weeks. A good friend of mine had something in her home with strings & clips that I loved, so I was determined to have the same idea but using an unfinished frame that I had found. This is what I came up with....
  Personalized for our family...
1. I bought an unfinished wood frame for fairly cheap @ Michael's (with a coupon of course). The frame is approx. 19 1/2 in by 23 1/2 in. Using a few supplies; the frame, tons of magazine scraps, a foam paint brush, my fingers & some Mod Podge I went to work decoupaging the entire thing. If you're wondering how, find decoupage directions HERE. I used small scraps from tons of random magazines & catalogs. I've definitely gotten into the habit of ripping out pages as I'm reading magazines when I spot a fun pattern. I store them in an old shoe box to be used on my next degoupaging project. Finally, after a few hours of fun in my basement, I was finished with all of the decoupaging & ready to screw in the eye hooks.
 
2. I found these small eye hooks in a picture hanging kit in my basement. I'm assuming you can find them at any hardware or craft store. I used four of them, two on each side. They were fairly easy to screw into the frame, but if you're having a hard time you could use pliers to hold on to each eye hook while twisting it in.
3. Then I came across a random piece of red, plastic-like string (also in the picture hanging kit). I cut two pieces, each about 18 in. long & fastened them to the eye hooks by knotting it on each side a few times. Trim off any access string as seen in the picture below.
4. And finally, I ventured to the fabric store to find these little clips to use for hanging. I found them in the isle with all of the window hanging supplies. I chose the smallest ones they had & they worked great. There is a small gap in the hanging circle that allowed me to just slip them on over the string w/o having to disconnect the string.
The entire project took a few hours but I'm in love with the end product! I've done them as gifts for friends too. I added a picture below of one that I did recently for a friend, but on a cork board instead. (I did block out the name @ the top) It's a fun, different way to display instead of having everything on your refrigerator. It can be hung in a kitchen, home office or even personalized for a child's bedroom.
Hope you decide to give it a try too! Enjoy, s.b.