Showing posts with label Holiday. Show all posts

4.19.2011

Envelope Bunnies

Only a few short days until Easter arrives. After a week of baby shower planning (I hosted a shower yesterday.) we're back into Easter mode. This cute idea comes compliments of Martha Stewart and her fabulous website. M & M each made their own Envelope Bunny & they turned out oh, so cute!

Supplies- Glue, Envelope, Scissors, Pink/White/Black Construction Paper, Crayon/Marker, Small Pom Pom.
1. Seal the flap of the envelope. (Gotta love that big tongue!)
2. Draw bunny ears on the sealed side of the envelope, as shown below.
3. Cut out the bunny ears, following the lines drawn above.
4. Use an opposite color construction paper to cut out small ear shaped inserts for the middle of the ears. (For example, we used white inside ears for the pink bunny & pink insides for the white envelope bunny.)
5. Cut out two small black construction paper eyes for each bunny envelope you're doing.
6. Glue the construction paper ear middles onto the envelope ears...
Press down to secure....
7. Glue the black eyes into place.
8. Place a large dab of glue in place of the nose. Set the pom pom onto the glue & allow a few hours to dry.
9. Draw the bunny mouth under the pom pom nose using a crayon or marker. (We did manage to draw the mouth while the glue under the nose was still wet. You could wait to do this step until the nose is completely dry....might be a bit easier!)
10. Once the nose is completely dry fill the bunny pocket with the pretend Easter grass...
And treats of course!

I think these little envelope bunnies would make the cutest little classroom treats. A great alternative to baskets that I'm sure any little one would be delighted to receivce!
Enjoy! s.b.

3.08.2011

Fat Tuesday Baking/Treat Idea...

It's Fat Tuesday & why not make something to celebrate. Doesn't this look delicious?
I found the recipe for this traditional Mardi Gras Kings Cake here @ Allrecipes.com 
I remember making one in school when I was young, complete with the plastic baby inside & all!
Give it a try...

It looks absolutely delicious & the girls would love it.
BUT, it does seem like a lot of work... the girls would only eat a small piece & I'd probably end up eating the entire thing myself! Not what I need being 7 months pregnant!!!

So a much easier Kings Cake alternative (the one that I'll definitely sign up for this afternoon after nap time) would be to make a quick stop at the grocery store & pick up a plain glazed donut for each child...
Once at home I'll whip up some easy powdered sugar frosting (a mixture of powdered sugar & water), separate the frosting into three dishes & color it green, yellow & purple. Then M1 & M2 can spread the green, purple & yellow icing onto their donuts themselves.(Alternating colors) I picture it to look somewhat like this...
Much easier & hands on for the girls as well!
I decided to post the idea using existing pictures from the web so you could give it a try as well. If I wait until I photograph M1 & M2 making them this afternoon it would be a bit late & Fat Tues. would be long over...
         I'm looking forward to surprising the girls with this Kings Cake treat later, I think they'll really enjoy      
it & I know it will taste great!
I also hope it turns out as planned in my head :)
Enjoy! s.b.

3.07.2011

Mardi Gras Masks

It's Mardi Gras time! The girls made their own fancy masks today... we'll add a few beads & we're all set to celebrate!

Supplies- White or Colored Construction Paper, Craft Sticks, Paint, Paint Brushes, Glue, Scissors, Sequence/Stickers/Feathers/Glitter/Etc. (For decorating) 
 
1. Cut out a large oblong oval shape using the white construction paper. (If you don't have paint, you may choose to use colored construction paper to add some color.)
2. Hold the oval up to your little one's eyes & make a small mark to mark where their eye holes should go.

3. Cut out small eye holes, as shown below.
4. Glue a craft stick to the back side of each mask as shown below. (You may choose to reinforce with a piece of scotch tape until the glue is dry.)
5. Choose a desired paint color & begin painting the front side of the mask. (We used glitter paint to make it a little more flashy!)
6. Once the paint has dried a bit, go ahead & start jazzing up the mask with all the extras you've gathered. Fasten them with glue.
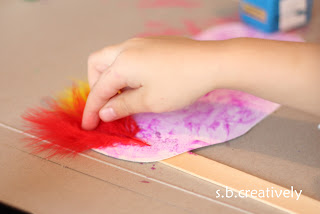
Here we glued a few colorful feathers to the upper left corner of the mask.
And a few sequence...
A few more down the mask's handle....
And then we finished with some glue around the eye holes sprinkled with glitter. (Shake off the excess of the garbage can.)
7. Allow a few hours to dry completely & you've got a Mardi Gras Mask!
So silly & definitely fun to play with.
The next picture is two days after we made our masks above... we went to Mardi Gras at our church & M1 created this mask. Much like the ones we had made but the actual mask was cut in a different (much cuter!) shape. Great idea to use a straw in place of the craft stick as well. You've got to have one of those things in your drawers!
Enjoy! s.b.

2.21.2011

Presidents Day Finger Puppets

Happy Presidents Day. I got this fun idea from kaboose.com while browsing through they president themed crafts. M1 doesn't really get the idea of Presidents Day, but she sure did like the finished puppets! They sure make a cute Abe Lincoln & George Washington...

Supplies- Glue, Blue.White.Black Construction Paper, Scissors, Tape, Markers, 1 Quarter & 1 Penny.

1. Cut two 3 1/2 inch by 7-8 inch rectangles. One blue & one black.
2. Roll the paper up (one @ a time) making sure that your little one's pointer finger can fit in the roll.
 
3. Tape the rolls shut along the edges.
4. Place a small loop of tape about 1/2 inch away from the top of each roll.
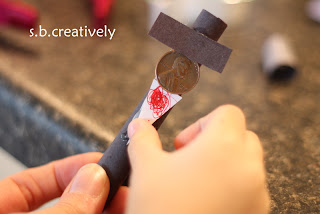
5. Place the penny & quarter (heads up) over the tape until secured.
6. Cut a small blue triangle & a 1 inch long black rectangle.
 7. Glue the blue triangle onto the top of the roll overlapping the top quarter. Glue the black rectangle on top of the black roll overlapping the top of the penny.
8. Cut a small long, narrow triangle & draw a small "bow" along the top. Glue under Abe Lincoln's head, aka the penny.
 9. Glue a small piece of a cotton ball below the quarter on the "breast" of George Washington.

10. Allow ample time to dry. We layed ours face down as shown below.
And time to play....
Happy Presidents Day!! Enjoy. s.b.

12.28.2010

New Year's Eve Noise Maker

Christmas has come & gone & we're now on to New Year's Eve festivities. We're having a few friends over to our house to celebrate both the New Year & M2's 2nd Birthday (a.k.a. Happy TWO Year! It's also her golden birthday... pictures to come!) I wanted to have a fun project planned for all the little ones Friday evening while we're celebrating to go along with all the hats, snacks & fun, so we took it for a test run today... New Year's Noise Makers!

Supplies- Large Paper Plate, Glue, Stapler, Uncooked Beans or Rice, 1 Large Popsicle Stick, Glitter, Various Decorations (foam pieces, sequence, stickers, etc. Basically whatever you can find!), Crayons/Markers for some color.

1. Fold the paper plate in half as seen below.
2. Staple around the edge of the plate about 3/4 of the way around, leaving a small hole near the end.

3. Fill the shaker with a handful of beans by pushing them through the unstapled end of the paper plate.

4. Complete the edge by stapling the rest of the way around, securing the beans inside the shaker.
5. Wedge the popsicle stick in between two of the staples near the bottom center of the shaker.
(If necessary, secure with a piece of scotch tape.)
6. Decorate away! I let M1 & M2 just place pieces where they wished until it was somewhat covered.
7. We also added a little glue/glitter to the outside edge of the shaker in an attempt to cover the staples a bit.
 (I gave M1 the option to color the shaker to give it some more color but she was happy with it just the way it was!)
8. Allow to dry & Shake Away!
I am looking forward to making these with all of our visitors Friday night. I'm pretty certain they'll have fun shaking & dancing to some music. I'm hoping to add some tissue paper streamers around the outside to jazz it up as well. I can't believe it's almost 2011!!!
Enjoy! s.b.

12.20.2010

Making Reindeer Food

We've got the cookies all baked & decorated for Santa & this morning we decided to make a little treat for Rudolph & all of his reindeer friends as well.
So easy... and the girls had so much fun. They are more than excited to scatter this all over the lawn (snow) for the reindeer to snack on while stopped at our house. They even had a little taste themselves!

Supplies- Sugar, Oats, Red/Green Sprinkles, Measuring Cup, Ziploc Bags or some other form of storage.

Mix 1/2 cup oats...

With 1/2 cup sugar....

Add some festive color with sprinkles (we used red & green)...

And mix well....
Place the reindeer food into a small ziploc bag & store with Santa's cookies until Friday night when it will be time to leave it all out!
Here is a cute little poem I got from a teacher friend to go along with the reindeer creation...

Make a wish & close your eyes tight
Then sprinkle on your lawn tonight
As Santa's reindeer fly & roam
The food will guide them to your home!

We're definitely ready for their arrival & the girls are soooo excited.
Enjoy the countdown this week. We sure will be!!
s.b.

12.15.2010

Handprint Santa

It's hard to believe that Christmas is just over one week away. I'm not ready for it all to be over just yet!!! Below is a craft that we made for the Grandma's last year. I did this one using M2's hand print & then the rest of the crafting I completed myself. When finished, we put them in festive frames so they could be used each year for decorations, & who could forget that tiny little hand print?!

If you're interested (sorry no tutorial for this one!), here is what you need...
Supplies- Blue Cardstock, White Paint, Paint Brush, A Small Piece of Red Corduroy, 2 Google Eyes, Red/Black/Pink Paper, A Small Pom-Pom, Small Silver Bead Strip & A Glitter Pen.

1. I stamped M2's hand 4 times on four different pieces of 4x6 paper. (One for each of the Grandma's & one for us!) I painted her hand first with the white paint & stamped it onto the paper, making sure to press down on each finger.
2. Once the hand prints were dry, I went ahead & started jazzing up this little Santa, using glue to fasten each piece on one at a time.
-Google eyes.
- Cut a small black circle nose.
-Cut two small pink circles for the cheeks.
- Cut a "hat" with the red corduroy. (If you don't have this, you could use red paper.)
-Add the fancy silver bead strip to the bottom of the hat. (Small pieces of cotton could be used for this as well.)
-Small pom-pom or cotton added to the end of Santa's hat.
-Last one! I used the silver glitter pen to write M2's name & add a few "ho, ho, ho's" to the picture.

Frame it & it's such a fun gift for grandma's, a teacher, godparents, etc. A cute little keepsake too!
Don't forget to enter in the Holiday Backpack Giveaway below... Tell all of your friends too! Winner will be chosen Monday!!!
Enjoy! s.b.