Showing posts with label Health. Show all posts

7.19.2011

My Five Senses Activity

I've said it before... my kids love cutting & cutting out of magazines. Here is a five senses activity that we dreamed up while crafting this week.
Supplies- Magazines, Scissors, Marker, Glue Stick/Glue, Construction Paper
1. Write "My 5 Senses" across the top of the construction paper.
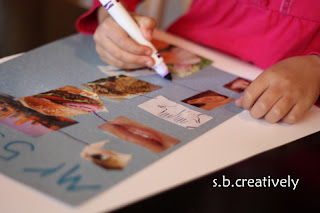
2. Begin searching through the magazines to find & cut out pictures of the body parts that go along with each of the senses... Eyes, Ears, Nose, Fingers, Mouth (One picture of each.)
M1 cutting out an eye...
3. Glue each of the body parts down the side of the paper as shown below.
4. Now back to the magazines to find & cut out the objects that we use our five senses for.
Example, below M1 found a vaccuum which we can hear with our ears, a hamburger that she can taste with her mouth, etc.
5. Glue the objects directly across from the body part we use our senses to identify.
6. M1 really wanted to draw a line from the "senses" to the objects on the right hand side...pictured below.
Here she is showing off her finished product. She taught M2 all about her senses afterwards. It was a mini lesson for her as well! A conversation I should have video taped. Too cute!
 Enjoy! s.b.

5.17.2011

Healthy v.s. Not Healthy Food Cut-Out Activity

A fun activity to get the little one's minds thinking about food. I feel like all my kids want to eat lately is JUNK! So this morning, the girls & I did this activity. Very easy & it was a great way to spark a good conversation about what foods we should be eating throughout the day!

Supplies-  Paper Plates, Scissors, Magazines, Markers, Glue Stick
 1. On one side of the paper plate write the word "Healthy."
M1 wrote it herself, I wrote for M2... it all depends on your child's age.
2. On the reverse side of the plate, write the words "Not Healthy."
3. Begin searching through magazines for pictures of healthy & not healthy foods.
4. Once your child finds a food, cut it out for them or have them do the cutting. (Again, depends on age.)
5. Glue the picture of the food to the correct side of the plate. 
Here is M1 gluing a picture of milk to the side that reads "Healthy."
6. Repeat steps 3-5 until you reach a desired amount of food pictures on each side of the paper plate.
And here she is holding up her finished product...I was happy she chose to show the "Healthy" side.
She did tell me that the foods on the "Not Healthy" side looked soooo delicious!
Enjoy! s.b.

2.26.2010

Pearly White Smiles


Here is a quick & easy activity for young children of any age. Just vary the level of difficulty if you'd like. For instance, I did all the cutting for M1, but if you have an older child you could allow them to do the cutting on their own.
~Supplies: *Scissors, *Glue Stick, *Magazines, *Tooth Template found HERE
To Begin- 1. Cut out the tooth. (If you don't have access to a printer, you could cut out a tooth free hand.)
2. Begin looking through the magazines with your child hunting for "teeth" pictures & cut them out.
3. Once you've got a good pile going, you can go ahead & help your child glue them on. We used a glue stick for this craft to make it a little easier for M1 since the magazine clippings are so flimsy. (She rubbed the glue stick on the paper & then set the pictures on top.)

2.24.2010

Brushing Away the "Plaque"


A fun activity that my dear friend shared with me. It's a great way to show how brushing really does clean your teeth. It's amazing how the stain really brushes away!

Find the directions for this activity HERE @ About.com
Happy Brushing!

p.s. Don't be afraid to become a "follower" on the right hand side of my page (I'd love to see who's visiting.. makes blogging more fun!) & feel free to pass s.b.creatively along to friends & family!

2.22.2010

Marshmallow Mouth Puppet


I've decided to do some kid activities/crafts this week in honor of February & Dental Health Month. Yes, we are all crazy teeth brushing/flossing fanatics because of Aunt K who is a dental hygenist. She keeps us on our toes & really gets the girls excited about dental hygene. This house has more tootbrushes than most & lots of fun extras too. Did you know that there are special suckers that are actually good for your teeth? How fun is that? Activity #1 is this mouth puppet that I dreamed up over the weekend. It turned out much better than I expected & M1 just loves it.

~Supplies: *Manilla Folder or 1 piece of paper folded in half, *Marshmallows, *Glue, *Small piece of red construction paper, *2 craft sticks, *Scissors

To Begin- 1. Use the manilla folder to cut out a half circle. This will be the base of the "mouth." I used the folder which worked great, but you could also use a thicker piece of paper & just fold in in half.
2. Glue the 2 craft sticks onto the side with the fold. One craft stick on each side as seen in pic #2. I put something heavier on top of it for a few minutes to help it dry flat.
3. While it's drying, cut out a small tongue. (If you don't have red paper, you could have your child draw a red tongue on the inside once it's dry.)
4. When dry, open up the mouth & lay flat. Glue in the tongue on one side of the circle & then begin w/ the "teeth." To make it easier for M1, I placed dots of glue around the outside of the mouth where she then placed each of marshmallows on her own. (Pic #3 & 4)
5. Give ample drying time before using it as a puppet. We let ours sit for about an hour. Use the sticks (one in each hand, moving up & down) to make your puppet talk!

Watch M1 demonstrate how her newly created puppet works