Showing posts with label Misc.. Show all posts

7.06.2011

Get Well Card

 My grandma (the girls' great-gram) had knee replacement surgery this week. Of course we had to make something...couldn't go to the hospital empty handed with our crafty reputation!
Last year when my grandpa had his surgery we made the Hospital Bag card, so we had to think of something new for this knee surgery...A card that looks like a leg/knee!

Supplies- Construction paper, Glue, Markers, Foam Letters, Ribbon, Hole Punch, Scissors.
1. Cut out a leg shaped card (pictured above) with a bend @ the knee. I left the fold @ the top of the leg above the "knee."
2. Cut out two "shoe" shapes. (Ours are purple above.)
3. Glue the shoes to the bottom of each leg. (The outside of the card & the inside)
4. Use the foam shapes to spell out "GET WELL." Ours were sticky & did not have to be glued. If you don't have letters, they can obviously be written on with marker/crayon.
5. Punch 4-5 holes in the top of the shoe.
6. String the black string through the holes like a shoe string & tie into a bow @ the top.
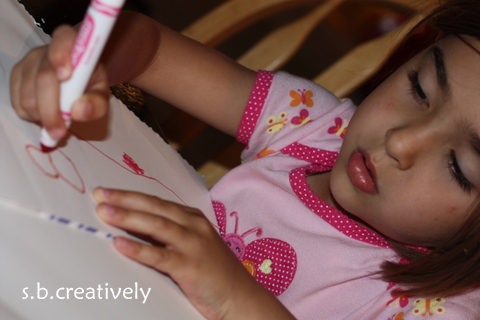
M1 writing Grandma's name on the outside shoe... "Get Well Grandma!"

7. Write a personal message on the inside of the card...
And here is our finished product. She loved it & is happy to show it off to all of her visitors and nurses!
Enjoy! s.b.

6.07.2011

The Final Countdown!!!

Ahhh, we've made it 9 full months & now we're down the the final countdown until little M3 arrives. Over the weekend we made an official countdown to make it a little easier for M1 & M2 to understand the timing of when she'll arrive. (I'm scheduled for a c-section, so unless she decides to arrive early we're pretty sure of her official birth date!) The girls are enjoying the countdown & are taking turns ripping the days off as they pass. It's definitely something they look forward to each morning & it really has helped them understand when she'll arrive. AND I'm not getting the "Mommy, is today the day M3 is coming out?" questions 5 times a day anymore!!! Obviously, not all of you are having baby countdowns... BUT this is still a great time to make a countdown of your own. Countdown to the last day of school, a family vacation, a birthday, etc. The possibilities are endless!
Here is M1 gluing our countdown together... 
Then I wrote the title across the top since she thought it was too much for her to write... she can get lazy at times!
M1 wrote all of the countdown numbers on the small square pieces of paper...
Still writing & practicing her #'s...
Then we fastened the numbers onto the piece of construction paper. We used small pieces of paper that were already part of a note pad so we only had to glue down the bottom one. Otherwise you could just place a small dot of glue on each square of paper to glue them together...the smaller the dab the easier to rip them apart! A stapler always works well too.
And here is M1 holding the finished countdown...we're down to 8 days now! Waaaa Whooo!
I'm going to try to keep up with the blog posts, but if you see a small lag... I apologize. I'll get back into it before you know it!
Enjoy! s.b.

3.29.2011

Gumball Machine w/ Template

Here M2 and I made a gumball machine using this printable Gumball Machine Template. Easy craft that involved a sorting activity as well. It was a lot of fun for us both.

Supplies- Glue, Printable Gumball Template, Scissors, Foam Shapes, 1 Piece of Construction Paper, Crayons.
1. Print the Gumball Template.
2. Pour out a bunch of shapes & have your little one sort out all of the CIRCLES only. These will be used as the gumballs.
*If you don't have foam shapes, you can simply use construction paper to cut out colored circles for the gumballs.
(M2 sorting & picking out all of the circles from the bag of foam shapes...)
3. Cut out the gumball machine & glue it to the colored piece of construction paper.
4. Begin gluing the small circles, one by one, onto the gumball machine placing small dots of glue on each circle.
5. Scatter the circles inside the gumball machine until it is full.
6. Color the gumball machine with crayons.
M2 enjoyed the sorting & the ease of this craft. Hopefully your little one will as well!
Enjoy! s.b.

3.01.2011

Read Across America Activities

For those of you wishing to participate in Read Across America tomorrow & the rest of the week, here is a link to some great Dr. Seuss activities to do at home with your little ones.
A handful of fun pritables including coloring pages, tic tac toe, a maze & much more. I've printed a bunch of activities for M1 & M2 to do on Wednesday during our reading day. (Like every day isn't a reading day??!!) I know they'll have fun with all the different activities especially since a few of them include  Cat from Cat in the Hat, which they both really enjoy. (We watch the t.v. show each morning & they LOVE the book.)
Enjoy & Happy Reading! s.b.

2.28.2011

Bookmarks!

Wednesday March 2nd is READ ACROSS AMERICA Day. A big day for school age children as most teachers will celebrate in the classroom. I've had several discussions with M1 about the importance of reading & we'll definitely celebrate with lots of books/reading as well on Wednesday.
In honor of the occasion, we made bookmarks!

Supplies- Scissors, Contact Paper, Thin Ribbon, Decorations (sequence, paper shapes, glitter, stickers, etc.), Small knife (for the adults!), Construction Paper.
*If you do not have contact paper, you can use colored construction paper & "laminate" it with clear book tape or packaging tape. Just need a little reinforcement so it lasts longer & doesn't tear.
1. We started with the hole punch & punched out a bunch of colorful shapes using colored construction paper. Just a few extras to add to our pile of decorations.
2. While M1 & M2 cut out shapes, I cut two 12X2 inch strips of contact paper.
(Again, you could just cut strips of construction paper here as well.)
3. Fold the contact paper strips in half.
4. Peel back the paper off half of the strip exposing the sticky side up.
5. Begin placing decorations all over the sticky paper. As many as desired.
Decorated, & ready to construct the bookmark...
6. Peel off the other half of the paper off the contact paper. Fold the undecorated side over on top of the decorated side & press to seal. (Trim off any edges that may not match up perfectly.)
7. ADULTS: Use a small exacto-knife (regular knife or scissors would work as well) to cut a small horizontal slit in the top of the bookmark.
8. Cut a piece of ribbon about 10 inches long.
9. Fold the ribbon in half & string the ends through small slit as shown below.
10. Feed the ends of the ribbon through the opposite "looped" end of the ribbon & pull to fasten, forming a small knot. (Also pictured below.)
And your bookmarks are all set & ready to mark the pages in any great book.
We're sending a few of these to M1 & M2's great-grandparents to use to mark the pages of their current favorite read!
Happy Reading & Enjoy!  s.b.

11.30.2010

Paper Pizza!

I can't believe Thanksgiving has come & gone already. It's even harder to believe that tomorrow is December 1st! I need to get going & plan some winter/holiday crafts. We've had a slow start to the week but we did manage to pop in at the library for story time.
This week's theme was Pizza & this is what M & M created....

They loved making their own pizzas. M2 had a hard time keeping the "cheese" out of her mouth but she did manage to finish with it looking great.
I loved that it was an easy craft with very few supplies.
*Small paper plate, red circle for the sauce (construction paper), yellow rectangles of tissue paper for the cheese & brown construction paper circles for the sausages.
Glue it all together & you've got a paper pizza!
It was a great way for M1 & I to practice circles & rectangles with M2 as well.
Enjoy....s.b.

9.08.2010

We LOVE to Make Cards....

In our house we LOVE to make homemade cards for any occasion. While the girls do enjoy making the cards, they find way more excitement when they actually get to give them to someone. In fact, M1 didn't even want my grandma to take the card home that she made below. For some reason she felt attached to this one! It's a lot of fun & I think most of our recipients are overjoyed to have a card made by the girls.
Supplies - *Construction paper, Stickers, Glue, Markers, Pipe Cleaners, Scissors, etc. (Basically whatever you wish.)
1. I usually have my girls decorate the inside of the card first. It makes it easier to let whatever we decide to put on the front have time to dry in the end.
I write a personal message & they go to town with the markers, stickers, foam pieces & so on.
2. Once the inside is all done, you can go ahead & start decorating the front of the card.
For this particular "birthday" card, we decided to make a few flowers using pipe cleaners & pom poms. (As seen below) M1 LOVES to glue anything right now, so this was a perfect card for her to make.
3. Adding the pom poms & foam leaves.
 
4. Allow to dry. (I obviously took this before the drying time. I wanted to make sure I got a shot of it before it went home with Great Grandma!)
M2 getting creative making her birthday card...
Another one of our card creations... My little sister got engaged on Labor Day, so hung up the phone & got to work so we'd have a card for them by the time they got to our house to celebrate.
I did all the cutting & let M1 glue all the pieces of the cake & the ring together. She did a great job!
Just a quick sample of a few of our card creations....
Enjoy! s.b.
Make it Yours @ My Backyard Eden

6.01.2010

Cute Frame for Dad

What a great gift for Father's Day.... and SO easy!
      Find the complete directions HERE @ kaboose.com. I am constantly buying unfinished wood frames from Michaels for $1.00. Add a little paint, some nuts & bolts and you're finished. What dad wouldn't love this??!
     We spent the weekend moving & are now busy getting settled @ our temporary home (a.k.a my parent's house). Thanks to M1 & M2 their house is no longer a quiet home... hopefully we're not here too long & our new home is ready very soon. Until then, I'm hoping to get crafting again as soon as next week. M1 is very anxious to create something new. Hope you all had a great Memorial Day weekend...
Enjoy! s.b.

4.30.2010

Good morning! This morning I'm posting a simple craft that can be done however you please. Definitely let your child use his/her imagination on this one. M1 just happened to request a house when we made ours, so I assisted her with making a stick house.

Supplies- *Glue, *Paint, *Craft Sticks, *Large White Paper, *Small Colorful Paper/Magazine Scraps
1. We began by gluing the craft sticks to the paper where we wanted them & in the shape of a house and tree.
2. Once they were glued down, M1 went ahead & painted the sticks, a sun & the tree.
3. After painting, I helped her choose all the green pieces of scrap paper she could find. Once she had a nice pile, she glued the scraps onto the tree as leaves.
4. Using the scraps again, we found a door, window & a small chimney.
 
Very simple, yet fun art activity for kids of all ages. It could be as basic as just gluing sticks to the paper & painting them. Craft sticks have ooodles of uses!
Enjoy! s.b.

4.26.2010

Earth Day Coffee Ground Fossils

I'm going to continue with at least one more Earth Day project this week (if not more). I think it's ok since we should be doing things to help the environment all year round, right?!! This project is a messy one that reuses coffee grounds & a 1/2 cup of leftover coffee. I found this one HERE @ Kaboose.com. Definitely caught my interest & is completely different from anything we had ever done w/ M1 & M2. We read over the directions & then chose to do our own thing, so ours are not exactly like the ones on Kaboose. They turned out great & it was a super fun activity for the girls.

Supplies- *Salt, *Coffee Grounds, *1/2 Cup Coffee, *Wax Paper, *Large Bowl, *Spoon, *Flour, *Measuring Cup, *Cookie Cutters or Objects to Press into the Fossil
1. Stir the together 1 c. coffee grounds, 1/2 c. cold coffee, 1 c. flour, and 1/2 c. salt.
M1 enjoyed all the measuring & mixing.
2. Lay out a large piece of wax paper.
3. Once mixed well, grab large portions of the mixture & flatten like a pancake. Lay the pancakes onto the wax paper.
4. Then you're ready to start creating your fossils. We started by making one with M1's hand.
It got quite messy, but it was so fun. Luckily, it was very nice out & we were able to do this all outside!

5. If you choose to do a hand print, great! If not, go ahead & use your cutters & random objects to press into the dough to create fossils.
We used a few animal cutters that were part of our Play Doh collection, but you could use anything...small animal figurines, coins, rocks, etc. M2 even got to participate! Her little hand is pictured below.
6. Allow time to dry & set. We let ours sit out for an entire day & they dried well. M1 has been playing with them outside. She enjoys hiding them & then searching for her fossils.
 
Enjoy! s.b.
p.s. We are in the process of selling our home & relocating due to a job change for my hubby. Why tell you this??! I'm apologizing in advance if there are weeks that I'm not posting as much as usual. Hopefully we're settled soon & it's a smooth process! We've done some packing already but the crafting stuff will be the last to get boxed up!