6.23.2011

Hospital Survival Kit for New Mothers (A gift for me!)

A good friend of mine arrived at the hospital after I delivered M3 a few days ago with something very similar to this...
A Hospital Survival Kit for New Mothers! What a great idea!
I was delighted to receive it & immediately wanted to know where she got the idea. (I have friends that still need to have babies!)
She found the idea & even the printables HERE on My Own Road's website.
My goodies were similar to, but not the same as these... you get the idea!
Such a cute gift. I have since went to her blog & checked it out (obviously to do this post!) and there are both girl & boy printables. I can't wait to make a few of these myself!
Enjoy! s.b.

6.17.2011

Father's Day Ideas...

A few more ideas for dad in case you're still looking...
The first two ideas come from marthastewart.com She's got a whole bunch of great ideas but these were my favorite.
I really want to make this cute frame for my husband but I'm going to wait until after I have a printed picture of M3. Perfect frame for him now that we have 3 little ones! I've got the template printed & ready to go. We'll see how soon he gets it!
I also thought these cards were so cute... maybe an idea for next year?!!
And who can forget the golden #1 Dad trophies from last year?! They were so fun to make & it looks great on my husband's desk. Find the tutorial HERE... M1 looks so young! What a difference a year can make.
Happy Father's Day this weekend to all the dads!
Enjoy the celebrations! s.b.

6.14.2011

Father's Day Poem

We made it... tomorrow our little M3 will be born via c-section. I am soooooo excited & anxious but couldn't leave with out some Father's Day posts this week. (I've planned ahead a bit!)
M1 loved posing in the weekly belly shots. Here we are just a day or so ago...all ready for our new addition!
I have one more Father's Day post that I'll post later this week, but until then...This was crafted a week or so ago. I was really trying to think ahead since I knew Father's Day would come just after M3's arrival. We may have to give it to him a bit early since he'll see this post, or BEG him not to look :)  A cute Father's Day poem with a string to hang in his office...

Supplies- Construction Paper or Foam Sheets, Foam Letters, Markers, Scissors, Hole Punch, Ribbon.
1. Use a piece of construction paper or in our case, a 8 1/2 x 11 piece of colored foam for the base of the poem.
2. Punch two holes in the top that will later be used to tie the string for hanging.
(If you don't have a punch, the string could just be glued or taped onto the back as well.)
3. Place the letters to spell "DADDY" down the center of the base. (Obviously, this could be Dad, Daddy, Father, Grandpa, etc.)
And if you don't have foam letters you can write them boldly with markers/crayons. It would also be cute to search for the letters in a magazine & glue them down! Just another idea...
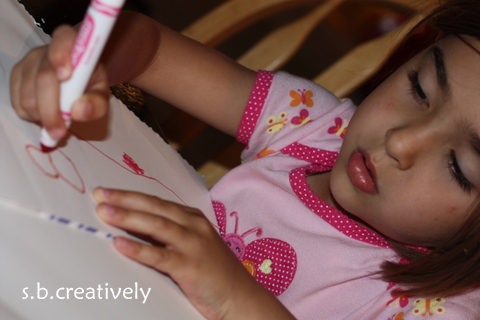
4. Together with the little ones, brainstorm words that describe Daddy. Our girls had so much fun with this. And oddly enough, most of the things they said worked with the letters. I did have to prompt them for a few!
5. Write the describing words across the base so that they line up with the coordinating letter. (Pictured below)
M1 is writing below...
Wonderful
Hilarious
Hard Worker
Kind
Always Fun!
6. Cut a piece of ribbon & tie the ends at each of the holes.
7. Make sure to have the little ones sign their names @ the bottom. Or write it for them if they're too small like M2. She does enjoy scribbling & thinking she's writing though :)
Done & ready to be wrapped for Daddy... hope he likes it!
Enjoy! s.b.

6.07.2011

The Final Countdown!!!

Ahhh, we've made it 9 full months & now we're down the the final countdown until little M3 arrives. Over the weekend we made an official countdown to make it a little easier for M1 & M2 to understand the timing of when she'll arrive. (I'm scheduled for a c-section, so unless she decides to arrive early we're pretty sure of her official birth date!) The girls are enjoying the countdown & are taking turns ripping the days off as they pass. It's definitely something they look forward to each morning & it really has helped them understand when she'll arrive. AND I'm not getting the "Mommy, is today the day M3 is coming out?" questions 5 times a day anymore!!! Obviously, not all of you are having baby countdowns... BUT this is still a great time to make a countdown of your own. Countdown to the last day of school, a family vacation, a birthday, etc. The possibilities are endless!
Here is M1 gluing our countdown together... 
Then I wrote the title across the top since she thought it was too much for her to write... she can get lazy at times!
M1 wrote all of the countdown numbers on the small square pieces of paper...
Still writing & practicing her #'s...
Then we fastened the numbers onto the piece of construction paper. We used small pieces of paper that were already part of a note pad so we only had to glue down the bottom one. Otherwise you could just place a small dot of glue on each square of paper to glue them together...the smaller the dab the easier to rip them apart! A stapler always works well too.
And here is M1 holding the finished countdown...we're down to 8 days now! Waaaa Whooo!
I'm going to try to keep up with the blog posts, but if you see a small lag... I apologize. I'll get back into it before you know it!
Enjoy! s.b.

6.01.2011

Button Flower Pot

Wow, it definitely finally feels like summer has arrived. We went from TONS of rain & cool weather to 86 and humid this week. Sounds great, but not when you're less than two weeks away from having a baby & carrying around a basketball in front of you!!! Luckily today provided some relief.
But thanks to the warmer weather the flowers are in full bloom & the neighborhood yards are looking great. I have to keep reminding M1 & M2 not to pick people's flowers! Here is a flower craft we made this week that included some sorting as well.
Supplies- Construction Paper, Glue, Markers (opt.), Scissors, Colored Buttons
1. Trace your little one's hand onto a green piece of paper & cut out.
2. Using the color/pattern of your choice, draw a flower pot (as shown below) & cut out as well.
Here are the two I cut out for M1 & M2. I used some patterned craft paper to add a little fun.
3. Glue the paper hand print onto a solid piece of construction paper.
(My girls chose to use blue like the sky.)
4. Glue the flower pot directly beneath the hand print.
5. Allow your little one to sort through the buttons choosing 5 to be used as their "flowers."
M2 loved this. She spent about 10 minutes sorting through them & in the end we had piles of sorted buttons. It was like two activities in one!
6. Glue a button to the end of each of the fingers, as shown below.

Allow some time for them to dry completely & you're done.
Tiny little button topped fingers that make an adorable flower pot!
Enjoy. s.b.