5.28.2010

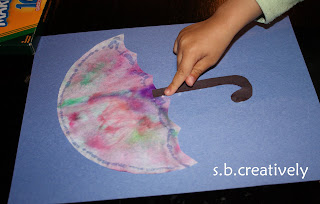
Raindrops With Glue....

I've done a few umbrella & rain projects throughout the past few weeks. I really wish I would have seen this project because I would have added a little "rain" a.k.a glue to some of our umbrella art. I found this HERE on MamaJenn's blog & just love it. So cute & soooo easy. If you don't feel like making this umbrella, I made one HERE that could be used for a similar effect. Just skip the marker rain drops & use the glue in place of them. We haven't had any rain in a few days... I need it to stay away through the weekend & our big MOVE!!!
Enjoy! s.b.

5.25.2010

Cookies!

Good morning! I've had a few emails & facebook messages since yesterday asking for the cookie/icing recipe. The cookie recipe can be found HERE and also in the February post with the Valentine cookies. I do add a bit more flour to the batter so it's not so sticky. Here are a few that I've photographed along the way.
Spring flowers...
Cookies for a friend's baby shower...
Valentines Day Hearts
M1's "3" Birthday Cookies
 The icing recipe I received from a friend. It is as follows...
2 c. powdered sugar
1 tsp vanilla
7 Tbsp. warm water
4 tsp. meringue powder
(Less water for the piping)

It's fairly easy but obviously a bit time consuming. I put the base icing on & let it set for 4-5 hours before decorating w/ the top layer. I think it's worth it when they're finished. They are always a hit!
Enjoy! s.b.

5.24.2010

M1's 3rd Birthday... a few days early.

Treat Bags...
 
"3" cookies...yummy!
 
Putting the finishing touch on the ice cream cone cupcakes...
Even more yummy!!!


A few photos from M1's crazy birthday party today. (Her actual birthday is this weekend.) I say crazy because my house is 3/4 empty & we are moving in 4 days! Birthday aside, it was a great time for M1 to get together with her little friends one last time before we make the big move this weekend. It's going to be difficult leaving everyone & we will miss our time with them. And, although the house was not decorated & it was scorching HOT outside we did have some very yummy treats and a lot of fun. Overall a very enjoyable morning for M1. She's absolutely delighted that she got a Toy Story Woody Doll & has been telling me all day about what a great day it's been. I love that & it makes all my work and the craziness of the party COMPLETELY worth it. Even if it's days before moving.....
Enjoy! s.b.

5.19.2010

Recycled Water Bottle Bubble Blowers

Ok, I thought I was going to be able to keep up with the kiddo crafts while in the process of moving but I was wrong! My house is half-boxed up & the rest needs to be boxed in the next week. Not to mention, I'm having a birthday party for M1 on Monday (with an empty house) before we leave town. Can you say crazy??!! So I've decided that the crafting may have to be put on hold for a week or three! Bare with me & I promise we'll be back. In the mean time, I'm just going to feature other's kiddo projects to keep your little ones busy.

These bubble blowing bottles are actually on my list of to-do's with M1 & M2. I got the idea from Family Fun magazine & then about a month ago I saw the featured on HowDoesShe.com They look so fun & I look forward to giving them a try. Click HERE for the full tutorial. Let me know if/when you give them a try. I'd love to hear your results!!
Enjoy! s.b.

5.13.2010

Coffee Filter Umbrella

It's another gloomy day here today... lots of rain & flash flood warnings. Not what I want to hear when we're two weeks away from moving. Wouldn't that be my luck?!  But the rain does give us more reason to create a rainy-day craft. Here is what I put together....

Supplies- *Coffee Filters, *Markers, *Construction Paper (White, Blue, Black) *Tape, *Glue, *Scissors
1. Tape the coffee filter to a large piece of paper or cardboard. This helps it lay flat & makes it easier to color on.
2. Using the markers, color as much or as little of the filter as you wish. Both M1 & M2 just scribbled on their filter, I'm not sure how actual drawings would turn out in the end. Just give your child free reign!
 
3. Once the filters are all covered with color, take them outside & place them in the rain for a bit. (The amount of time outside depends on how hard it's actually raining. At our house it was raining quite hard, so we only left them out a few minutes. Long enough to get completely soaked!) M1 got all dressed up in her gear & brought them out. At least we all didn't have to get wet!
4. Bring the wet filters inside & allow them to dry. *They'll dry a lot faster if you take them off the base paper.
5. Cut the filter in half with some dips to make it look like an umbrella & glue it to the blue construction paper.
6. Use the black paper to cut out an umbrella handle & attach it using glue.
7. Use the markers (blue) one more time to create some rain drops around the umbrella. M2 actually used a blue crayon, it was a bit easier for her to hold.
 
And there you have it, two colorful umbrellas made using the rain itself! So cute...
(M1 on the left & M2 on the right)
Enjoy! s.b.

5.11.2010

Dandelion Painting

Yes, we've got dandelions in our yard...no, my husband is not happy about it! Fortunately, we're moving in 3 short weeks so we won't have to worry about it for a while!! (I'm working hard to keep crafting in between all the packing!) But since we've got them, why not use them? M1 & M2 helped me pick a whole pile of them this weekend & then we used them as paint stamps. Very simple & very fun for both girls.

Supplies- *Various Paint Colors, *Dandelions, *White paper, *Scotch Tape, *Paper Plate
1. Tape the paper down to keep it in place & it doesn't fly away in the wind. (We did this project outside.)
2. Have your child pick which color they want to start with & put a small amount of it on the paper plate so they can dip their dandelion.
3. Repeat with other colors, using a different dandelion for each color paint.
4. Stamp as little or as much as your child would like.
5. Allow time to dry.
6. Then it's up to you...leave the prints and display as is or get creative. I cut around their prints & kept their dandelion paintings to use for another project. I think I may glue them to the front of a home-made greeting card to be used as a Thank You from each of the girls.
 
Enjoy! s.b.

5.07.2010

Who doesn't love a good Thunderstorm?!

It's raining here this morning & it's supposed to continue ALL day! So why not create something that mimics the weather?! If you're one of the lucky ones with no rain today, this is still a fun & messy craft that little ones are sure to enjoy! I got this idea from a crafty friend of mine...

Supplies- *Paper Plate, *Small Bowls (for mixing), *White Shaving Cream, *Black & Blue Paint, *White Paper, *Small Yellow Paper, *Scissors, *Glue, *Spoon, *Paint Brush, *Tape, *Ribbon (Not Pictured)
1. Pour a significant amount of shaving cream into your small mixing bowl.
2. Add a little under equal parts glue.
3. Pour a small bit of black paint into the mixture (just enough to tint it grey).
4. Allow little hands to mix well.
 
5. Spoon the mixture onto the paper plate. Use the paint brush to spread the grey cloud mix all over, covering the entire plate. *Rinse the brush as soon as they've finished.
6. Set aside & allow a few hours to dry.
7. While the cloud is drying, your little one can get started on the rain drops. Use the blue paint to cover an 8 1/2 X 11 piece of paper & allow to dry. (If your little one is really ambitious, they could paint the other side of the blue paper also. That way when they spin around while hanging, both sides would be blue.)
8. Once it's dry, cut out a few rain drops & use the yellow paper scrap to create a lightning bolt. (Again, depending on the age of your child you could have them do the cutting.)
 
10. Hours later, once the cloud has set- Use ribbon or string to tape hang the drops & lightening bolt from the dark cloud.
11. Hang to display their very own rain/thunderstorm!!
Enjoy! s.b. 

5.04.2010

Our Favorite Pumpkin Muffins

These are one of our absolute favorites... Pumpkin muffins! M1 & M2 eat these delicious muffins year round & share my love of squash/pumpkin. We make these (mini) muffins once a week, no lie & I freeze them in large zip-loc bags to be taken out of the freezer once we're ready for one. It's a perfect breakfast muffin or afternoon snack. What's even better is they do not contain dairy like most muffin recipes do. M1 has a fairly severe dairy allergy & I now know that it's hard to find muffin/bread recipes that do not contain milk &/or buttermilk so these are perfect. I received the recipe from a friend a few years back & since then we've made a few changes to make them a bit healthier... I'll put my substitutions/changes in (parenthesis) so you can see both versions of the recipe.

2 cups white flour (whole wheat flour)
1 1/2 cups sugar (3/4 cup)
1 tsp. baking soda
1/4 tsp. baking powder
3/4 tsp. salt
1/2 tsp. cinnamon
1/2 tsp. nutmeg
1 cup canned pumpkin (I've used fresh in the fall)
2 eggs
1/2 cup oil (applesauce)
1/2 cup water

1. Mix together dry ingredients in a large mixing bowl.
   2. Combine "wet" ingredients in a small bowl & mix well.
           3. Combine the dry & wet ingredients until just moistened.
     4. Spoon the mixture into a greased muffin pan (we use a mini-muffin pan) 3/4 full.
 5. Bake mini-muffins @ 325 for 15-20 minutes. (Longer if you're making regular size muffins.)
          6. Allow a few minutes to cool before removing them from the pan.
        7. Place whatever you don't eat in a large zip-loc to store in the freezer for weeks. M1 likes to put  the frozen muffin in the microwave for 15-20 seconds for the "out of the oven" warmth!
Enjoy your delicious breakfast or snack! s.b.