7.27.2011

Delicious Summer Baking...

The girls enjoyed these this week for a fun summer treat...
Made by a friend & I thought they were soooo cute.

The base of the sandal is a Nutter Butter Cookie.
Spread a small amount of frosting over the top of the cookie to help secure a fruit roll-up piece to add some color for the base of the shoe.
Then topped off with some more frosting to hold the Sour Straws into place as the strap of the flip-flop.

If the flip-flop's don't look like something you'd like, you could give these a try...
Don't they look so cute?! You can find the recipe HERE on Shutterfly's blog.
They look easy enough & don't require any odd ingredients. (Always a plus!)
What a great idea to add green "glaze" for the rind.
I can not wait to give them a try with M & M. It would be a perfect project for a rainy day like today if I didn't have so much laundry to catch up on! Maybe later this week...
Too cute & yet so easy to create... I'm sure they'd be a hit with any little one!

Enjoy! s.b.
7.19.2011

My Five Senses Activity

I've said it before... my kids love cutting & cutting out of magazines. Here is a five senses activity that we dreamed up while crafting this week.
Supplies- Magazines, Scissors, Marker, Glue Stick/Glue, Construction Paper
1. Write "My 5 Senses" across the top of the construction paper.
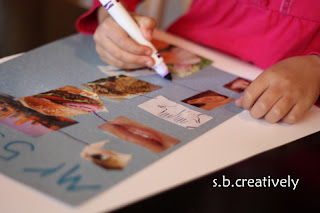
2. Begin searching through the magazines to find & cut out pictures of the body parts that go along with each of the senses... Eyes, Ears, Nose, Fingers, Mouth (One picture of each.)
M1 cutting out an eye...
3. Glue each of the body parts down the side of the paper as shown below.
4. Now back to the magazines to find & cut out the objects that we use our five senses for.
Example, below M1 found a vaccuum which we can hear with our ears, a hamburger that she can taste with her mouth, etc.
5. Glue the objects directly across from the body part we use our senses to identify.
6. M1 really wanted to draw a line from the "senses" to the objects on the right hand side...pictured below.
Here she is showing off her finished product. She taught M2 all about her senses afterwards. It was a mini lesson for her as well! A conversation I should have video taped. Too cute!
 Enjoy! s.b.

7.06.2011

Get Well Card

 My grandma (the girls' great-gram) had knee replacement surgery this week. Of course we had to make something...couldn't go to the hospital empty handed with our crafty reputation!
Last year when my grandpa had his surgery we made the Hospital Bag card, so we had to think of something new for this knee surgery...A card that looks like a leg/knee!

Supplies- Construction paper, Glue, Markers, Foam Letters, Ribbon, Hole Punch, Scissors.
1. Cut out a leg shaped card (pictured above) with a bend @ the knee. I left the fold @ the top of the leg above the "knee."
2. Cut out two "shoe" shapes. (Ours are purple above.)
3. Glue the shoes to the bottom of each leg. (The outside of the card & the inside)
4. Use the foam shapes to spell out "GET WELL." Ours were sticky & did not have to be glued. If you don't have letters, they can obviously be written on with marker/crayon.
5. Punch 4-5 holes in the top of the shoe.
6. String the black string through the holes like a shoe string & tie into a bow @ the top.
M1 writing Grandma's name on the outside shoe... "Get Well Grandma!"

7. Write a personal message on the inside of the card...
And here is our finished product. She loved it & is happy to show it off to all of her visitors and nurses!
Enjoy! s.b.

7.01.2011

4th of July Firecracker

A fun firework decoration just in time for the holiday weekend.
You can find the directions HERE on the BIC website. They have lots of fun & easy crafts that are all usually completed with Sharpie markers... obviously, regular washables would work just as well!
Enjoy the long weekend! s.b.