3.30.2011

April Fools Food Pranks... A few of my favorites!

April Fools Day can be so fun for little ones... I never had anything like this when I was little. Fun treats to make the holiday even more enjoyable with out ending up wet or angry that someone tricked you! Look @ this... sushi that I can actually eat while prego!!! Love it!
These Faked Potatoes aren't an edible treat but fun to play with any pretend kitchen...
The next best thing to Mc Donald's hamburgers (in my children's eyes!)...
Family Fun has a HUGE list of Food Pranks (both edible & non) for little ones including the ones pictured above. I didn't have the best luck finding clear pictures, but you get the idea. I wish I could make them all. Added bonus is most of them are sweet treats, my favorite right now! The Rice Cereal Meat Loaf looks hilarious & so real. Be sure to check it out. A good treat to "fool" the dads!
Also, this Appealing Prank looks like a great one to start the day...our girls love a banana with breakfast...
What do you have planned for April Fools Day tomorrow?
Enjoy! s.b.
3.29.2011

Gumball Machine w/ Template

Here M2 and I made a gumball machine using this printable Gumball Machine Template. Easy craft that involved a sorting activity as well. It was a lot of fun for us both.

Supplies- Glue, Printable Gumball Template, Scissors, Foam Shapes, 1 Piece of Construction Paper, Crayons.
1. Print the Gumball Template.
2. Pour out a bunch of shapes & have your little one sort out all of the CIRCLES only. These will be used as the gumballs.
*If you don't have foam shapes, you can simply use construction paper to cut out colored circles for the gumballs.
(M2 sorting & picking out all of the circles from the bag of foam shapes...)
3. Cut out the gumball machine & glue it to the colored piece of construction paper.
4. Begin gluing the small circles, one by one, onto the gumball machine placing small dots of glue on each circle.
5. Scatter the circles inside the gumball machine until it is full.
6. Color the gumball machine with crayons.
M2 enjoyed the sorting & the ease of this craft. Hopefully your little one will as well!
Enjoy! s.b.

3.22.2011

Basketball Hoop

NCAA Basketball continues Thursday. M1 & M2 don't have a choice if they want to watch or not... their daddy is in charge of the t.v. when the games are on :) They've gotten into it a bit & enjoy cheering for the teams that their dad needs to win for his bracket!
Here M2 & I created a basketball hoop making it up as we went... it resembles a hoop right??!!

Supplies- Blue/Red/White/Black Construction Paper, Glue, Scissors, Black Marker, Ribbon, Red Pipe Cleaner, Orange Foam Circles (Alt. Orange Construction Paper)
1. Use an entire piece of blue paper as the base of the hoop.
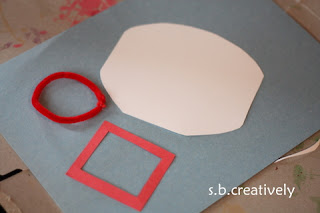
2. Use the white construction paper to cut out a backboard (pictured below).
3. Use the red paper to cut out a small red square for the back board & also a red circle to be used for the hoop. *We used a red pipe cleaner & made it into a circle.
4. Glue the white back board to the upper half of the blue paper.
5. Cut a thin black strip of paper for the basketball hoop pole.
Glue it underneath the back board.
6. Glue the red square on top of the back board.
7. Glue the red hoop right underneath the back board as pictured below.
8. Cut the white ribbon into small strips & begin gluing them underneath the hoop to create the appearance of a net. (If you don't have white ribbon, you could cut small strips of white paper to achieve the same look.)
9. With the black marker, draw the lines of a basketball on the small orange circles.
(We used foam circles but orange construction paper circles would do the trick as well. Lots of options here!)
10. Glue the basketballs around the hoop where ever your little one desires.
And there you have it... a basketball hoop.
M2 was so very proud of this & couldn't wait to show daddy & M1 when they got home. She'll be parading around the house with it once the games start up again I'm sure!
Enjoy! s.b.

3.16.2011

Paper Plate Leprechaun

Two of the cutest little red-bearded men I've ever seen! This Leprechaun was pretty easy to make & the girls just loved it! I remember doing this project while in college with a fieldwork teacher. I'm sure it's not exactly like what we did at that time, but they turned out pretty cute!

Supplies- Paper Plate, Yellow/Green/Black Construction Paper, Orange Paint (Marker/Crayon), Paint Brush, Scissors, Glue, Google Eyes (opt.), Pom Pom Nose (opt.)
1. Use the green paper to cut out a large green top hat. I cut a square hat & a rounded hat.
2. Cut a small black belt to fit across the hat.
3. Cut a yellow square buckle.
(Again, I do a lot of the cutting because M1 & M2 are still pretty young. If you're crafting with bigger little ones you can always allow them to cut out the shapes as well. Start by drawing the shapes on the paper for them & allowing them to cut.)
4. Use orange paint to paint around the outside of the paper plate only, leaving the center (flat part) white.
(If you don't have paint, using an orange crayon/marker to color around the edge would work as well.)
5. Apply a generous amount of glue to the top of the plate.
6. Press the hat on top the glue.
7. Glue the black belt onto the hat.
8. Glue the yellow buckle on top of the belt.
9. Make the leprechaun face with whatever you've got.
We used google eyes, an orange pom pom for the nose & a small strip of black crinkled paper for the smile. The eyes & nose could be cut out of construction paper circles or you could simply draw all of the facial features as well. It's all about what supplies you've got!)
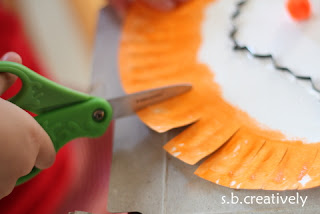
10. Once the orange paint is dry enough, cut small slits along the exterior of the plate, aka. the beard.
And there you have it, two sneaky leprechauns as M1 likes to call them.
Enjoy & Happy St. Patty's Day!
s.b.

3.14.2011

Paper Shamrocks

I feel like St. Patrick's Day snuck up on me this year. The weeks are just flying by & here we are half way through March! Here are our green paper heart SHAMROCKS!

Supplies - Green/White Construction Paper, Scissors, Glue, Green Decorations (sequence, buttons, glitter, tissue paper scraps, decorative paper scraps, etc.)
1. Cut out three large green hearts using the green construction paper.
2. Using the scraps, cut a long green rectangular stem as well.
3. Glue the hearts onto the white construction paper to form a shamrock shape.
4. Glue the stem on as well, pressing down lightly on each shape so it doesn't curl up.
4. Begin gluing down all the GREEN decorative pieces, scattering them all over the shamrock.

6. Allow time to dry & display!
(M1 chose to write the word SHAMROCK across hers once it was completely dry.
M2's is on the right.)
Enjoy! s.b.

3.08.2011

Fat Tuesday Baking/Treat Idea...

It's Fat Tuesday & why not make something to celebrate. Doesn't this look delicious?
I found the recipe for this traditional Mardi Gras Kings Cake here @ Allrecipes.com 
I remember making one in school when I was young, complete with the plastic baby inside & all!
Give it a try...

It looks absolutely delicious & the girls would love it.
BUT, it does seem like a lot of work... the girls would only eat a small piece & I'd probably end up eating the entire thing myself! Not what I need being 7 months pregnant!!!

So a much easier Kings Cake alternative (the one that I'll definitely sign up for this afternoon after nap time) would be to make a quick stop at the grocery store & pick up a plain glazed donut for each child...
Once at home I'll whip up some easy powdered sugar frosting (a mixture of powdered sugar & water), separate the frosting into three dishes & color it green, yellow & purple. Then M1 & M2 can spread the green, purple & yellow icing onto their donuts themselves.(Alternating colors) I picture it to look somewhat like this...
Much easier & hands on for the girls as well!
I decided to post the idea using existing pictures from the web so you could give it a try as well. If I wait until I photograph M1 & M2 making them this afternoon it would be a bit late & Fat Tues. would be long over...
         I'm looking forward to surprising the girls with this Kings Cake treat later, I think they'll really enjoy      
it & I know it will taste great!
I also hope it turns out as planned in my head :)
Enjoy! s.b.

3.07.2011

Mardi Gras Masks

It's Mardi Gras time! The girls made their own fancy masks today... we'll add a few beads & we're all set to celebrate!

Supplies- White or Colored Construction Paper, Craft Sticks, Paint, Paint Brushes, Glue, Scissors, Sequence/Stickers/Feathers/Glitter/Etc. (For decorating) 
 
1. Cut out a large oblong oval shape using the white construction paper. (If you don't have paint, you may choose to use colored construction paper to add some color.)
2. Hold the oval up to your little one's eyes & make a small mark to mark where their eye holes should go.

3. Cut out small eye holes, as shown below.
4. Glue a craft stick to the back side of each mask as shown below. (You may choose to reinforce with a piece of scotch tape until the glue is dry.)
5. Choose a desired paint color & begin painting the front side of the mask. (We used glitter paint to make it a little more flashy!)
6. Once the paint has dried a bit, go ahead & start jazzing up the mask with all the extras you've gathered. Fasten them with glue.
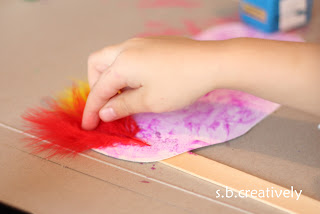
Here we glued a few colorful feathers to the upper left corner of the mask.
And a few sequence...
A few more down the mask's handle....
And then we finished with some glue around the eye holes sprinkled with glitter. (Shake off the excess of the garbage can.)
7. Allow a few hours to dry completely & you've got a Mardi Gras Mask!
So silly & definitely fun to play with.
The next picture is two days after we made our masks above... we went to Mardi Gras at our church & M1 created this mask. Much like the ones we had made but the actual mask was cut in a different (much cuter!) shape. Great idea to use a straw in place of the craft stick as well. You've got to have one of those things in your drawers!
Enjoy! s.b.