1.27.2011

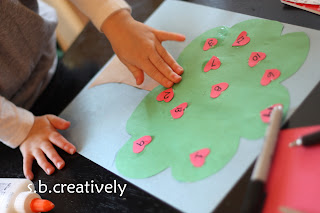
Valentines Day Countdown Tree

Here is a little something that M2 & I created this week. She really loves anything that involves art & the time when M1 is at school is great for us to craft together. Here is how we made her Valentines Day Countdown Tree...
Supplies- Blue, Red, Green & Brown Construction Paper, Scissors, Glue, Black Marker & Stickers
1. Using the green paper, cut out a tree top shape. (Mine just looked like a chunky cloud.)
2. Use the brown paper to cut a tree trunk.
3. Use the red paper to cut out 14 small hearts.
(I did the prep work myself since M2 is a bit small, but older children could do this themselves if the adult drew the lines to follow while cutting.)
4. Number each of the hearts 1-14 using a marker.
5. Glue the pieces of the tree (trunk & tree top) onto the blue piece of paper.

6. Glue the small hearts all over the tree in no particular order.
And you're done... now we'll wait until February 1st. That's when we'll begin counting down the days until Valentines Day by placing a small valentine sticker, one day at a time, on each of the days until we get to the big day.... February 14th!
Enjoy! s.b.

1.23.2011

We Love Our Green Bay Packers!!

We are Green Bay Packer Fans so today is a big day! We're having a group of friends over for the game & M1 & M2 are SOOOO excited for the party and to wear their dresses yet again! We're hoping that this isn't the last game of the season & that we get to cheer on our favorite team in the Super Bowl in a few short weeks.
Last night we made these green & gold treats for all to enjoy....
And a few days ago we crafted two of these paper bag footballs...
                                    
*The rice krispie treats were made using the regular recipe. We made two batches adding green & yellow food coloring to the marshmallow/butter mixture before stirring in the rice cereal.
Therefore... you could customize these yummy treats to match the colors of your favorite team as well :)

*The football was crafted using these steps...
1. Cut a brown grocery bag into the shape of a football. (You can make it as large or as small as you wish.)
2. Allow your little one to cover the paper with brown paint & give some time to dry a bit.
3. We used a few pieces of black duct tape to create a few small strips for the laces. (Other things you could use include electrical tape, masking tape or white medical tape... the actual laces on a football are actually white :)
4. Place the strips as seen above onto the football to create the appearance of laces.

Football fans enjoy the remaining games & Go Packers!!
Enjoy. s.b.

1.18.2011

Craft Stick Snow Sled

Lots of snow here @ our house & it just keeps coming. Gotta love winter :) Snow or not, this is a great winter craft for all....
Supplies- Glue (We used Tacky Glue, it works best), Scotch Tape (optional... thought we might have needed it, but didn't!), Ribbon & 7 Craft Sticks
1. Place a thick line of glue across one of the craft sticks & lay it horizontally.
2. One by one, begin placing 5 of the craft sticks across the horizontal stick. I guided M1 a bit so the sticks were staggered to look like a sled, not just straight across.
3. Glue another horizontal line across the craft sticks, right about the other horizontal stick.
4. Place the 7th stick across the glue line.
5. Cut a strip of ribbon about 8 inches long.
6. Dab two large dots of glue right about the horizontal craft stick & place the two ends of the ribbon onto the glue.
7. Allow a few hours to dry completely.
This is what we've been using our sled for here @ our house. M1 & M2 drag their little dolls around on it, it's hilarious! I love their little imaginations.
Enjoy! s.b.

1.11.2011

Q-tip Snowflakes

It's well known that Q-tips are great for everyday use, but did you know they make great snowflakes as well?!
I know you've all got some in your bathroom so go dig them out & get crafting!

Supplies- Q-tips, Glue, Scissors, Blue Construction Paper, (the tape is optional)
1. Leave a few of the Q-tips whole & then begin cutting the others in half.
I cut some in half, some a bit shorter than half & a few right under the cotton swab so they are all different lengths.
2. Begin drawing lines with the glue on the blue construction paper. (Pictured below.) One line at a time.
3. Place the various Q-tips onto the glue lines beginning with the center (whole) Q-tip & then adding the cut ones afterwards.
4. It's important that you put enough glue on the paper so that the Q-tips will dry into the glue. It's a mess @ first but it all dries clear!
5. Repeat with each snowflake. (We chose to do three.)
6. Allow a few hours for the glue to completely dry.
7. We chose to add a few foam letters to jazz up our snowflake picture for Daddy so he could hang it in his office.
All done!
Have fun & enjoy! s.b.

1.04.2011

The Mitten Activity

I wanted to share a cute craft/activity that M1 brought home from school. I'm sure most of you have read The Mitten by Jan Brett. It's a favorite at our house along with Gingerbread Baby. I thought this was such a cute idea & M1 really enjoyed it. Her mitten has been played with for days. M2 enjoyed it as well, especially after reading the story many times.
Here is the story in case you haven't read or heard of it...
And here is her mitten.
At home I would cut out two mittens using colored construction paper & staple them together around the outside edge, leaving the opening to the mitten unstapled.
(They were able to get the image of the mitten on the construction paper using a copy machine. You my be able to put colored paper in your printer as well :)
 
Then simply use your computer to search for images to print out the animals of the story. (bear, raccoon, owl, fox, bunny, etc)
Cut them out & allow your little one to color them before placing them into their mitten.
 
Such a cute & easy craft that pairs well with a great book. Both of my girls are big into books so this was definitely a hit! M1 reads the story as M2 places the animals into the mitten.
It's snowing her today... we're crafting some fun winter stuff & drinking hot chocolate.
Enjoy! s.b.